
Ingredients
Use a kitchen scale for the most accurate results.
Bread flour500 g Water350 g Active sourdough starter100 g Salt10 g
Ingredient notes
- Bread flour: Provides strength and structure, helping the loaf rise beautifully.
- Water: Use room-temperature water. The amount may need slight adjustment depending on the flour.
- Active sourdough starter: Your starter should be bubbly, recently fed, and close to its peak.
- Salt: Enhances flavor and helps control fermentation.
Instructions
Step 1: Mix the flour and water
Add 500 g of bread flour and 350 g of water to a large mixing bowl. Mix with your hands or a sturdy spoon until no dry flour remains. The mixture will look rough and slightly sticky, which is perfectly normal.
Cover the bowl and let the dough rest for 30–60 minutes. This resting period, often called autolyse when flour and water are mixed before the other ingredients, helps the flour absorb the water and makes the dough easier to stretch.
Step 2: Add the sourdough starter and salt
Add 100 g of active sourdough starter and 10 g of salt to the dough. Work the ingredients into the mixture by pinching, folding, and squeezing gently with your hands.
Continue mixing until the starter and salt are evenly distributed. The dough may initially feel slippery or difficult to handle, but it should become more cohesive as you work it.
Cover and rest for another 20–30 minutes.
Step 3: Develop the dough with stretch and folds
Over the next two hours, perform four sets of stretch-and-folds, spacing them about 30 minutes apart.
To perform a stretch-and-fold, wet your hand lightly, lift one edge of the dough, stretch it upward without tearing it, and fold it over the center. Rotate the bowl and repeat on all four sides.
Each set strengthens the gluten network, allowing the dough to hold gas and develop a better structure. By the final set, the dough should feel smoother, more elastic, and stronger than when you first mixed it.
Keep the bowl covered between each set to prevent the dough from drying out.
Step 4: Bulk fermentation
After completing the folds, leave the dough covered at room temperature until it has expanded noticeably and looks airy. Depending on the strength of your starter and the room temperature, this stage may take another two to four hours or longer.
Look for a dough that has increased in volume by roughly 30–70%, contains small bubbles along the sides, and jiggles slightly when the bowl is moved.
Avoid relying only on the clock. In a warm kitchen, fermentation progresses faster; in a cool kitchen, it takes longer. Over-fermented dough may become weak, sticky, and difficult to shape.
Step 5: Shape the loaf
Lightly flour your work surface and gently turn out the fermented dough. Handle it carefully to preserve as much of the trapped air as possible.
Fold the edges toward the center, then turn the dough seam-side down. Use your hands or a dough scraper to pull it gently across the work surface, creating surface tension.
The finished dough should form a neat, rounded ball with a smooth outer surface. Do not add too much flour, as this can make the dough difficult to seal and shape.
Let the dough rest for 15–20 minutes if it feels tight, then make any final adjustments to its shape.
Step 6: Final proof
Dust a proofing basket or a bowl lined with a clean kitchen towel with rice flour or regular flour. Place the dough inside, seam-side up.
Cover it and choose one of two proofing methods:
- Room-temperature proof: Leave it for approximately one to two hours, checking regularly for signs of readiness.
- Cold proof: Refrigerate for eight to sixteen hours. This option is convenient for overnight baking and often produces a more developed flavor.
The dough should look slightly expanded and feel airy. A gentle fingertip press should spring back slowly rather than immediately or not at all.
Step 7: Preheat the oven
Place a Dutch oven with its lid inside your oven and preheat to 240°C (465°F) for at least 30–45 minutes.
The preheated pot traps steam released from the dough, allowing the loaf to expand before the crust sets. If you do not have a Dutch oven, use a heavy baking tray and a suitable oven-safe method of generating steam.
Always handle hot cookware carefully, and never pour water into a hot glass dish or onto an oven surface unless the manufacturer explicitly permits it.
Step 8: Score and bake
Carefully turn the dough onto a piece of baking parchment. Using a sharp bread lame or razor designed for baking, make one confident slash approximately 1 cm deep across the top. This helps control where the bread expands.
Transfer the dough, with the parchment if appropriate for your cookware, into the hot Dutch oven. Cover with the lid and bake for 20 minutes.
Remove the lid, reduce the temperature to around 220°C (425°F), and bake for another 20–30 minutes, until the crust is deeply golden brown.
If the loaf browns too quickly, reduce the oven temperature slightly and continue baking until the center is cooked through.
Step 9: Cool before slicing
Remove the loaf from the oven and transfer it to a wire rack. Allow it to cool for at least two hours before slicing.
Although the bread will smell irresistible, cutting it too early can leave the interior gummy because moisture is still redistributing and the crumb is finishing its setting process.
Once cooled, slice with a serrated bread knife and enjoy the crisp crust and soft, chewy center.
Tips for Perfect Unloaf Sourdough Bread
- Use an active starter: A healthy starter should rise predictably after feeding and show plenty of bubbles.
- Watch fermentation, not just time: Temperature, starter strength, and flour type affect how quickly dough rises.
- Measure accurately: A digital kitchen scale gives more consistent results than measuring cups.
- Build strength gradually: Stretch-and-folds help the dough hold its shape without intensive kneading.
- Create steam: A covered Dutch oven is one of the easiest ways to achieve a crusty artisan loaf.
- Be patient: Proper cooling improves the final texture and makes slicing much easier.
Storage and Serving Suggestions
Store the cooled loaf cut-side down on a wooden board or in a bread bag at room temperature for up to two or three days. For longer storage, slice the bread and freeze it in an airtight bag for up to about three months. Toast slices directly from frozen as needed.
Serve your homemade sourdough with butter and honey, avocado and eggs, olive oil and herbs, or your favorite soup. It also makes excellent sandwiches and crunchy breakfast toast.
Conclusion
Unloaf sourdough bread is a rewarding recipe that transforms four simple ingredients into a flavorful, rustic loaf. The secret is to use a lively starter, develop the dough gently, allow enough fermentation time, and bake in a thoroughly preheated oven. While sourdough requires patience, each step helps create a loaf with a crisp crust, a tender interior, and a distinctive homemade flavor.
With practice, you will learn to recognize when your dough is ready by its appearance, elasticity, and bubbles rather than relying entirely on timing. Enjoy the process, experiment with fermentation, and make this artisan sourdough bread a regular part of your home baking routine.
🍞 Unloaf Sourdough Bread Recipe
Homemade Artisan Bread · Naturally Fermented · Crispy Crust & Soft Interior
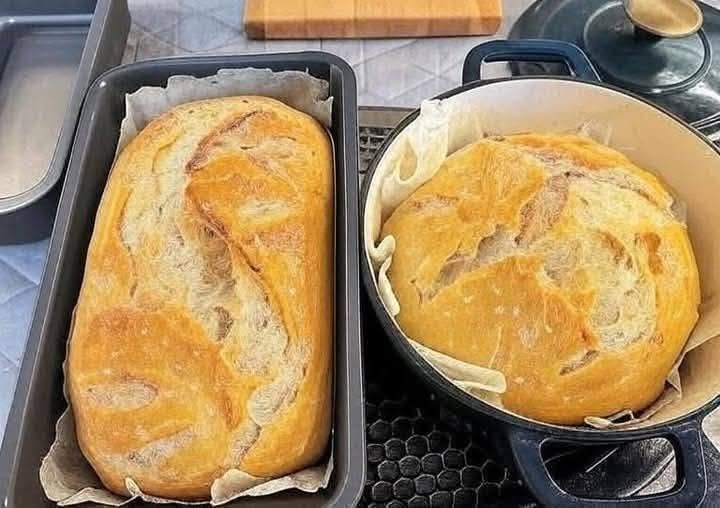
Unloaf sourdough bread is a beautiful homemade loaf with a golden, crunchy crust, a chewy interior, and a delicious, slightly tangy flavor. Made with a natural sourdough starter instead of commercial yeast, this bread develops its flavor through slow fermentation. It is perfect for breakfast, sandwiches, toast, or serving alongside soups and salads.
This recipe is ideal for home bakers who want to make artisan-style sourdough bread with simple ingredients and traditional techniques. With a little patience and the right method, you can enjoy fresh, bakery-quality bread straight from your own oven.
Recipe Overview
Total time
18–24 hours
Baking time
40–50 minutes
Yield
1 large loaf
Difficulty: Moderate
Ingredients
Use a kitchen scale for the most accurate results.
Bread flour500 g Water350 g Active sourdough starter100 g Salt10 g
Ingredient notes
- Bread flour: Provides strength and structure, helping the loaf rise beautifully.
- Water: Use room-temperature water. The amount may need slight adjustment depending on the flour.
- Active sourdough starter: Your starter should be bubbly, recently fed, and close to its peak.
- Salt: Enhances flavor and helps control fermentation.
Instructions
Step 1: Mix the flour and water
Add 500 g of bread flour and 350 g of water to a large mixing bowl. Mix with your hands or a sturdy spoon until no dry flour remains. The mixture will look rough and slightly sticky, which is perfectly normal.
Cover the bowl and let the dough rest for 30–60 minutes. This resting period, often called autolyse when flour and water are mixed before the other ingredients, helps the flour absorb the water and makes the dough easier to stretch.
Step 2: Add the sourdough starter and salt
Add 100 g of active sourdough starter and 10 g of salt to the dough. Work the ingredients into the mixture by pinching, folding, and squeezing gently with your hands.
Continue mixing until the starter and salt are evenly distributed. The dough may initially feel slippery or difficult to handle, but it should become more cohesive as you work it.
Cover and rest for another 20–30 minutes.
Step 3: Develop the dough with stretch and folds
Over the next two hours, perform four sets of stretch-and-folds, spacing them about 30 minutes apart.
To perform a stretch-and-fold, wet your hand lightly, lift one edge of the dough, stretch it upward without tearing it, and fold it over the center. Rotate the bowl and repeat on all four sides.
Each set strengthens the gluten network, allowing the dough to hold gas and develop a better structure. By the final set, the dough should feel smoother, more elastic, and stronger than when you first mixed it.
Keep the bowl covered between each set to prevent the dough from drying out.
Step 4: Bulk fermentation
After completing the folds, leave the dough covered at room temperature until it has expanded noticeably and looks airy. Depending on the strength of your starter and the room temperature, this stage may take another two to four hours or longer.
Look for a dough that has increased in volume by roughly 30–70%, contains small bubbles along the sides, and jiggles slightly when the bowl is moved.
Avoid relying only on the clock. In a warm kitchen, fermentation progresses faster; in a cool kitchen, it takes longer. Over-fermented dough may become weak, sticky, and difficult to shape.
Step 5: Shape the loaf
Lightly flour your work surface and gently turn out the fermented dough. Handle it carefully to preserve as much of the trapped air as possible.
Fold the edges toward the center, then turn the dough seam-side down. Use your hands or a dough scraper to pull it gently across the work surface, creating surface tension.
The finished dough should form a neat, rounded ball with a smooth outer surface. Do not add too much flour, as this can make the dough difficult to seal and shape.
Let the dough rest for 15–20 minutes if it feels tight, then make any final adjustments to its shape.
Step 6: Final proof
Dust a proofing basket or a bowl lined with a clean kitchen towel with rice flour or regular flour. Place the dough inside, seam-side up.
Cover it and choose one of two proofing methods:
- Room-temperature proof: Leave it for approximately one to two hours, checking regularly for signs of readiness.
- Cold proof: Refrigerate for eight to sixteen hours. This option is convenient for overnight baking and often produces a more developed flavor.
The dough should look slightly expanded and feel airy. A gentle fingertip press should spring back slowly rather than immediately or not at all.
Step 7: Preheat the oven
Place a Dutch oven with its lid inside your oven and preheat to 240°C (465°F) for at least 30–45 minutes.
The preheated pot traps steam released from the dough, allowing the loaf to expand before the crust sets. If you do not have a Dutch oven, use a heavy baking tray and a suitable oven-safe method of generating steam.
Always handle hot cookware carefully, and never pour water into a hot glass dish or onto an oven surface unless the manufacturer explicitly permits it.
Step 8: Score and bake
Carefully turn the dough onto a piece of baking parchment. Using a sharp bread lame or razor designed for baking, make one confident slash approximately 1 cm deep across the top. This helps control where the bread expands.
Transfer the dough, with the parchment if appropriate for your cookware, into the hot Dutch oven. Cover with the lid and bake for 20 minutes.
Remove the lid, reduce the temperature to around 220°C (425°F), and bake for another 20–30 minutes, until the crust is deeply golden brown.
If the loaf browns too quickly, reduce the oven temperature slightly and continue baking until the center is cooked through.
Step 9: Cool before slicing
Remove the loaf from the oven and transfer it to a wire rack. Allow it to cool for at least two hours before slicing.
Although the bread will smell irresistible, cutting it too early can leave the interior gummy because moisture is still redistributing and the crumb is finishing its setting process.
Once cooled, slice with a serrated bread knife and enjoy the crisp crust and soft, chewy center.
Tips for Perfect Unloaf Sourdough Bread
- Use an active starter: A healthy starter should rise predictably after feeding and show plenty of bubbles.
- Watch fermentation, not just time: Temperature, starter strength, and flour type affect how quickly dough rises.
- Measure accurately: A digital kitchen scale gives more consistent results than measuring cups.
- Build strength gradually: Stretch-and-folds help the dough hold its shape without intensive kneading.
- Create steam: A covered Dutch oven is one of the easiest ways to achieve a crusty artisan loaf.
- Be patient: Proper cooling improves the final texture and makes slicing much easier.
Storage and Serving Suggestions
Store the cooled loaf cut-side down on a wooden board or in a bread bag at room temperature for up to two or three days. For longer storage, slice the bread and freeze it in an airtight bag for up to about three months. Toast slices directly from frozen as needed.
Serve your homemade sourdough with butter and honey, avocado and eggs, olive oil and herbs, or your favorite soup. It also makes excellent sandwiches and crunchy breakfast toast.
Conclusion
Unloaf sourdough bread is a rewarding recipe that transforms four simple ingredients into a flavorful, rustic loaf. The secret is to use a lively starter, develop the dough gently, allow enough fermentation time, and bake in a thoroughly preheated oven. While sourdough requires patience, each step helps create a loaf with a crisp crust, a tender interior, and a distinctive homemade flavor.
With practice, you will learn to recognize when your dough is ready by its appearance, elasticity, and bubbles rather than relying entirely on timing. Enjoy the process, experiment with fermentation, and make this artisan sourdough bread a regular part of your home baking routine.