
Ingredients
For the Dough
- 3 ½ cups all-purpose flour
- 2 ¼ teaspoons active dry yeast
- 1 cup warm milk
- ¼ cup granulated sugar
- 1 large egg
- ¼ cup unsalted butter, melted
- 1 teaspoon salt
For Brushing
- 2 tablespoons melted butter
Step 1: Warm the Milk
Pour the milk into a small bowl or measuring jug. It should be warm but not hot. Very hot milk can damage the yeast, while cold milk will make the yeast activate more slowly.
A comfortably warm temperature is ideal.
Add the sugar and yeast to the warm milk. Stir gently and let the mixture sit for about 5–10 minutes.
The mixture should become slightly foamy. This is a good indication that the yeast is active.
Step 2: Prepare the Dough
In a large mixing bowl, combine about 3 cups of the flour with the salt.
Add the yeast and milk mixture, followed by the egg and melted butter.
Mix everything together using a wooden spoon or sturdy spatula.
The mixture will gradually come together into a soft, slightly sticky dough.
Add the remaining flour little by little rather than adding it all at once. You may not need every bit of flour.
The goal is to make a soft dough that is slightly tacky but not extremely sticky.
Step 3: Knead the Dough
Transfer the dough to a lightly floured work surface.
Knead it for approximately 8–10 minutes by hand.
Push the dough forward with the heel of your hand, fold it back toward yourself, turn it slightly, and repeat.
As you knead, the dough should become smoother and more elastic.
You can also use a stand mixer fitted with a dough hook. Knead on low to medium speed until the dough becomes soft and elastic.
Try not to add excessive flour during kneading. Too much flour can produce dense or dry dinner rolls.
Step 4: First Rise
Shape the dough into a ball.
Lightly grease a clean bowl and place the dough inside.
Turn the dough once so that its surface is lightly coated with oil or butter.
Cover the bowl with plastic wrap or a clean kitchen towel.
Place it somewhere warm and allow the dough to rise for about 1–1 ½ hours, or until it has roughly doubled in size.
The exact rising time depends on the temperature of your kitchen.
Step 5: Divide the Dough
Once the dough has doubled, gently press it down to release excess air.
Transfer it to a lightly floured surface.
Divide the dough into approximately 12 equal pieces.
For very neat rolls, try to make the pieces similar in size.
You can use a kitchen scale if you want perfectly even rolls, but dividing them by eye also works well.
Step 6: Shape the Rolls
Take one piece of dough and gently pull the edges toward the center.
Turn it over so the smooth side is facing upward.
Cup your hand around the dough and gently roll it against the work surface until it forms a smooth ball.
Repeat with the remaining pieces.
Try to create smooth, rounded dough balls because this helps the finished rolls rise evenly.
Step 7: Arrange the Rolls
Grease a 9×13-inch baking dish or a similar-sized baking pan.
Arrange the dough balls in the pan with a little space between them.
They should not be packed tightly at this stage because they need room to expand during the second rise.
Cover the pan loosely with a clean towel.
Step 8: Second Rise
Let the shaped rolls rise for another 30–45 minutes.
They should become noticeably larger, soft, and puffy.
This second rise is important because it helps create the light and fluffy texture associated with good homemade dinner rolls.
Avoid rushing this step.
Step 9: Prepare the Oven
While the rolls are completing their second rise, preheat the oven to 375°F (190°C).
Place the oven rack in the center position.
A properly preheated oven helps the rolls bake evenly and develop a beautiful golden surface.
Step 10: Bake the Rolls
Place the risen rolls into the preheated oven.
Bake for approximately 18–22 minutes, or until the tops are lightly golden brown.
Keep an eye on them during the final few minutes because baking times can vary between ovens.
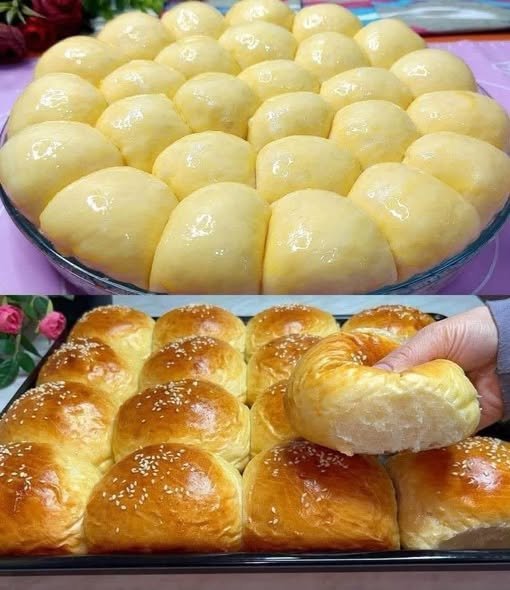
The rolls should look puffed and golden on top.
Step 11: Add Butter
As soon as the rolls come out of the oven, brush the tops generously with melted butter.
The butter adds flavor and gives the crust a soft, glossy finish.
Allow the rolls to cool for a few minutes before serving.
They are especially delicious while still warm.
Tips for Extra Soft Dinner Rolls
Don’t Use Too Much Flour
One of the most common reasons homemade rolls become dense is excessive flour.
The dough should remain soft and slightly tacky. Add flour gradually and stop when the dough becomes manageable.
Use Fresh Yeast
If your yeast is old or inactive, the dough may not rise properly.
Testing the yeast in warm milk before making the dough can help confirm that it is active.
Don’t Make the Milk Too Hot
The milk should be warm rather than steaming hot.
Very hot liquid can interfere with the yeast and prevent the dough from rising properly.
Give the Dough Enough Time
Bread dough needs time to rise.
Instead of relying only on the clock, look at the dough. During the first rise, it should approximately double in size. During the second rise, the rolls should become visibly puffy.
Avoid Overbaking
Overbaking can make dinner rolls dry.
Once the tops are lightly golden and the rolls are cooked through, remove them from the oven.
Brush With Butter
Brushing the hot rolls with melted butter immediately after baking helps keep the tops tender and adds delicious buttery flavor.
How to Store Dinner Rolls
Allow the rolls to cool completely before storing them.
Place them in an airtight container or sealed food-storage bag.
They can generally be kept at room temperature for a couple of days.
For longer storage, freeze the baked rolls in a freezer-safe bag or container. When you want to serve them, thaw them and gently warm them in the oven.
How to Reheat Them
For the best texture, place the rolls in a warm oven for a few minutes.
You can also microwave an individual roll briefly, but avoid heating it for too long because it can become chewy.
A little melted butter brushed over the warm roll makes it taste freshly baked again.
Serving Ideas
These soft homemade rolls can be served alongside almost any meal.
Serve them with:
- Roast chicken
- Turkey
- Beef roast
- Mashed potatoes
- Gravy
- Vegetable soup
- Tomato soup
- Creamy soups
- Pasta
- Baked vegetables
- Holiday dinners
- Breakfast eggs
They are also delicious sliced open and filled with leftover chicken, turkey, cheese, or vegetables.
Make-Ahead Option
You can prepare the dough ahead of time.
After kneading, place the covered dough in the refrigerator and allow it to rise slowly.
When you’re ready to bake, bring the dough out, shape the rolls, and allow them enough time to become puffy before baking.
Because refrigerated dough rises more slowly, you may need to allow additional time before baking.
Why These Rolls Become So Fluffy
The combination of yeast, milk, butter, and egg creates a rich and tender dough.
Yeast produces gas during fermentation, which creates the air pockets that make bread light.
The milk and butter contribute tenderness, while the egg gives the dough structure and richness.
Proper kneading also helps develop gluten, which gives the dough enough strength to hold the gases produced by the yeast.
The two rising periods are equally important. The first rise develops flavor and structure, while the second rise gives the shaped rolls their final volume and airy texture.
Troubleshooting
My Dough Isn’t Rising
Check the temperature of your kitchen and make sure the yeast was active.
A cool kitchen can significantly slow the rising process.
Give the dough additional time if necessary.
My Rolls Are Dense
Dense rolls can result from too much flour, insufficient kneading, inactive yeast, or not allowing the dough to rise enough.
Next time, add flour gradually and allow both rising stages to finish properly.
My Rolls Spread Too Much
The dough may have been too soft or insufficiently shaped.
Make sure the dough balls have a smooth surface and are placed reasonably close together in the baking pan.
My Rolls Are Too Brown
If the tops are browning too quickly while the inside still needs time, loosely cover the pan with foil during the remaining baking time.
Final Thoughts
These Soft & Fluffy Homemade Dinner Rolls are an excellent recipe to keep in your baking collection. They require simple ingredients, but the result is incredibly satisfying: golden tops, tender sides, and a soft, fluffy center.
The most important things to remember are to use active yeast, keep the dough soft, avoid adding too much flour, knead properly, and give the dough enough time to rise.
Once baked, brush the warm rolls with melted butter and serve them alongside your favorite meal. Whether you’re making them for an ordinary family dinner or a special gathering, homemade rolls have a way of making the whole meal feel extra special.
Quick Recipe Summary
Prep Time: 20 minutes
First Rise: 1–1 ½ hours
Second Rise: 30–45 minutes
Bake Time: 18–22 minutes
Oven Temperature: 375°F (190°C)
Yield: About 12 rolls
Ingredients
- 3 ½ cups all-purpose flour
- 2 ¼ teaspoons active dry yeast
- 1 cup warm milk
- ¼ cup sugar
- 1 egg
- ¼ cup melted butter
- 1 teaspoon salt
- 2 tablespoons melted butter for brushing
Method
- Combine warm milk, sugar, and yeast.
- Let the mixture stand for 5–10 minutes.
- Mix flour and salt in a large bowl.
- Add the yeast mixture, egg, and melted butter.
- Mix into a soft dough.
- Knead for 8–10 minutes.
- Let the dough rise until doubled.
- Divide into 12 pieces.
- Shape into smooth balls.
- Place in a greased baking pan.
- Let rise again for 30–45 minutes.
- Bake at 375°F (190°C) for 18–22 minutes.
- Brush immediately with melted butter.
- Serve warm and enjoy.