
Ingredients
Use a kitchen scale for the most consistent sourdough results.
Ingredient checklist
0 of 8
Bread flour
300 g
Active sourdough starter
100 g
Lukewarm water
180 g
Unsalted butter, softened
25 g
Honey or sugar
15 g
Fine sea salt
6 g
Olive oil or softened butter, for greasing
As needed
Melted butter, for brushing
15–20 g
Choosing the right sourdough starter
Use an active, bubbly starter that has recently risen after feeding. Ideally, it should be near its peak, with a pleasant, mildly tangy aroma. A starter that is weak or has not been fed recently may require a longer fermentation time.
Bread flour provides structure and chewiness, while butter adds tenderness. Honey or sugar helps round out the flavor and encourages browning. You can use all-purpose flour if needed, although the rolls may be slightly less chewy.
Instructions
Step 1: Mix the dough
In a large mixing bowl, combine the active sourdough starter, lukewarm water, and honey. Stir until the starter is mostly dissolved. Add the bread flour and mix until no dry patches remain.
Cover the bowl and let the mixture rest for 20–30 minutes. This short resting period allows the flour to absorb the water and makes the dough easier to knead.
Add the softened butter and salt. Knead by hand for approximately 8–10 minutes, or use a stand mixer with a dough hook for 5–7 minutes on low speed. The dough should become smooth, elastic, and slightly tacky. Avoid adding too much extra flour, as this can make the finished rolls dry.
Step 2: Begin the first rise
Place the dough in a lightly greased bowl and cover it with a lid, plastic wrap, or a damp kitchen towel. Let it ferment at room temperature until it looks noticeably puffier and has increased in volume by approximately 50–75%.
Depending on the strength of your starter and the temperature of your kitchen, this may take 4–7 hours or longer. In a warm kitchen, fermentation will generally be faster; in a cool kitchen, it will take longer.
For better texture, perform two or three gentle stretch-and-folds during the first 90 minutes. To do this, lift one edge of the dough, stretch it upward without tearing, and fold it over the center. Rotate the bowl and repeat.
The dough does not have to double completely. Look for a lighter texture, a slightly domed surface, and small air bubbles around the edges.
Step 3: Divide and shape the mini rolls
Lightly flour your work surface and turn out the fermented dough. Divide it into 12 equal pieces, approximately 52 grams each.
To shape each piece, fold the edges underneath toward the center to create a small bundle. Turn it seam-side down and gently roll it against the work surface using your cupped hand until the top becomes smooth and rounded.
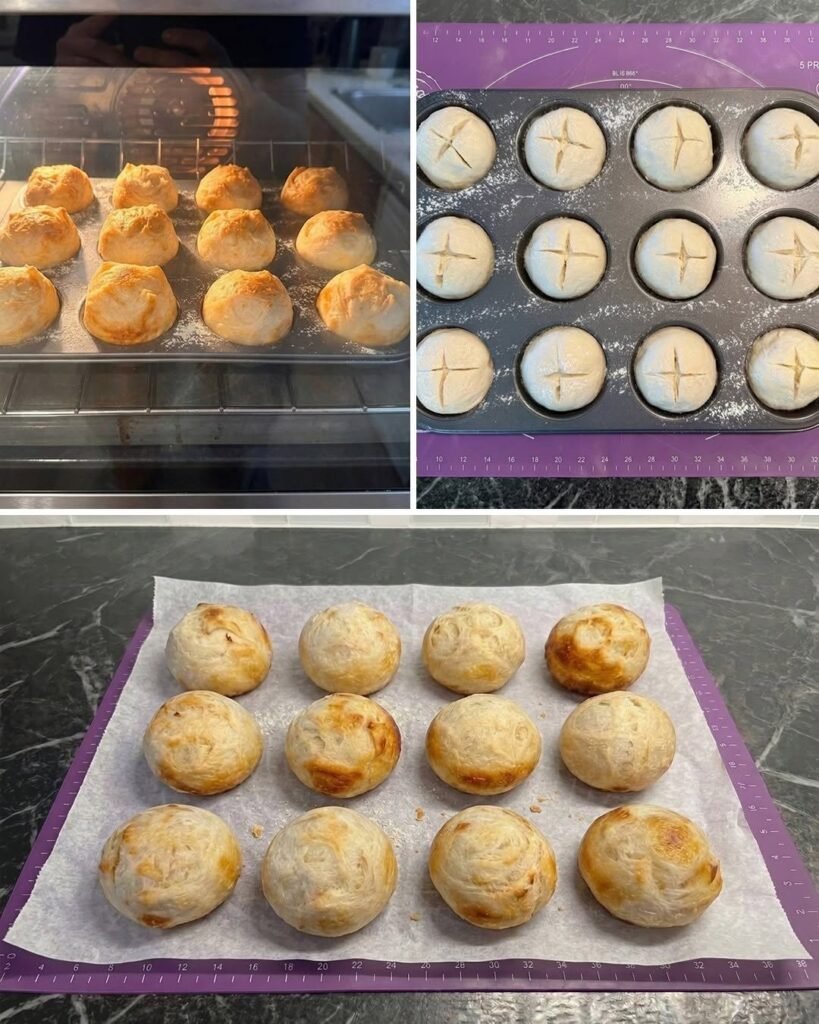
Grease all 12 cups of a standard muffin tin with butter or olive oil. Place one dough ball into each cup, seam-side down. The muffin cups will help the rolls hold their shape while they rise and bake.
For a softer, pull-apart texture, place the dough balls gently into the cups without pressing them down.
Step 4: Proof the rolls
Cover the muffin tin loosely and allow the rolls to rise for approximately 1–3 hours, depending on room temperature and starter activity.
The rolls should look puffy, feel lighter, and expand noticeably. When gently pressed with a fingertip, the dough should spring back slowly rather than immediately returning to its original shape.
Do not rush this stage. Underproofed rolls may bake up dense, while overproofed dough can lose its structure. Watch the dough rather than relying on the clock alone.
If you want to prepare the dough ahead, you can refrigerate it after shaping for an overnight proof. Keep the rolls covered to prevent the surfaces from drying, and allow additional time at room temperature if they still look firm and underproofed.
Step 5: Preheat the oven
Preheat your oven to 190°C (375°F). Position a rack in the center of the oven so the rolls bake evenly.
While the oven heats, check that the rolls have risen sufficiently. If desired, lightly brush the tops with melted butter for a richer finish. You can also leave them plain and brush them immediately after baking.
Step 6: Bake until golden
Place the muffin tin in the preheated oven and bake for 18–22 minutes, or until the rolls are golden brown on top and cooked through.
The exact baking time will depend on your oven and the size of the dough portions. If the tops brown too quickly, loosely cover the tin with foil for the remaining baking time.
For a more precise check, the center of a fully baked roll should generally reach about 93–96°C (200–205°F). The rolls should feel light and sound slightly hollow when tapped.
Remove the tin from the oven and immediately brush the tops with melted butter. This adds flavor and keeps the crust soft and appealing.
Step 7: Cool and serve
Let the rolls rest in the muffin tin for 5 minutes, then carefully transfer them to a wire rack. Allow them to cool for at least 10–15 minutes before serving.
For the softest texture, serve them slightly warm with salted butter, cream cheese, or your favorite spread. You can also slice them horizontally to make mini sandwiches filled with cheese, eggs, roasted vegetables, or leftover roast chicken.
Tips for Perfect Mini Sourdough Rolls
- Measure accurately: Weighing the ingredients helps create consistent dough and evenly sized rolls.
- Watch fermentation: Room temperature and starter strength affect rising times considerably.
- Keep the dough soft: A slightly tacky dough usually produces more tender rolls than a stiff, heavily floured one.
- Grease the muffin tin well: This prevents sticking and helps the baked rolls release cleanly.
- Avoid cutting them while piping hot: A short cooling period allows the crumb to finish setting.
- Customize the flavor: Add chopped fresh rosemary, garlic powder, sesame seeds, or a little grated Parmesan for a savory variation.
Serving Ideas
With butter
A simple side for soups, stews, and family dinners.
Mini sandwiches
Fill with cheese, egg, chicken, or roasted vegetables.
Storage and Reheating
Store completely cooled rolls in an airtight container at room temperature for up to 2 days. For longer storage, freeze them in a freezer-safe bag for up to 2–3 months.
To reheat, warm the rolls in a 160°C (320°F) oven for approximately 5–8 minutes. Frozen rolls can be thawed at room temperature before reheating. A light brush of butter after warming will help restore their soft, flavorful finish.
Avoid storing the rolls in the refrigerator, as refrigeration can cause bread to become stale more quickly.
Frequently Asked Questions
Can I make these rolls with all-purpose flour?
Yes. Substitute all-purpose flour gram for gram. The dough may feel slightly softer, and the finished rolls may have a more delicate crumb.
Can I prepare the dough the night before?
Yes. After shaping the rolls and placing them in the greased muffin tin, cover and refrigerate them overnight. The next day, assess their rise and let them continue proofing at room temperature if necessary before baking.
Why are my sourdough rolls dense?
Common causes include a weak starter, insufficient fermentation, underproofing, or adding too much flour during kneading. Make sure the starter is active and give the dough enough time to become airy before baking.
Can I make the rolls dairy-free?
Yes. Replace the butter in the dough with olive oil or a plant-based butter alternative, and use the same alternative for greasing and brushing. The flavor and texture may vary slightly.
Do I need to add steam to the oven?
No. These small enriched rolls bake well without added steam. The muffin tin and butter help them develop a tender interior and attractive golden tops.
Final Thoughts
Mini sourdough rolls baked in a muffin tin are a wonderful way to enjoy homemade bread without shaping a full loaf. Their small size makes them convenient to serve, their buttery crumb pairs beautifully with savory and sweet foods, and their naturally fermented flavor makes them special enough for entertaining.
Once you master the basic recipe, experiment with herbs, cheese, seeds, or a touch of garlic butter. With an active starter, careful fermentation, and a little patience, you can create a batch of soft, golden mini sourdough rolls that your family will want to make again and again.