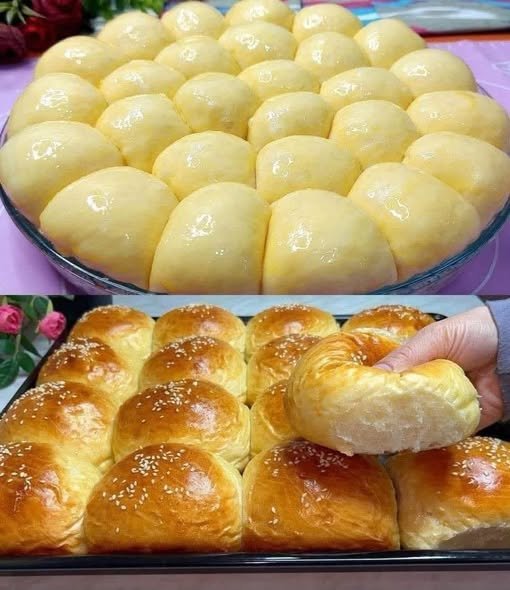

Ingredients
For the Dough
- 4 cups all-purpose flour
- 2 1/4 teaspoons active dry yeast
- 1/3 cup granulated sugar
- 1 teaspoon salt
- 3/4 cup warm whole milk
- 3 large eggs
- 1 teaspoon vanilla extract, optional
- 6 tablespoons unsalted butter, softened
For the Egg Wash
- 1 egg
- 1 tablespoon milk
Optional Topping
- Sesame seeds
- Poppy seeds
- A sprinkle of flaky salt
- Melted butter
Important Ingredient Notes
Flour
All-purpose flour works very well for these rolls. If your flour is particularly soft or your kitchen is humid, you may need a small amount of additional flour, but avoid adding too much.
The dough should remain soft and slightly tacky rather than becoming stiff.
Milk
Whole milk produces particularly rich and tender rolls. The milk should be warm, not hot.
Very hot milk can damage the yeast, while cold milk slows fermentation.
Eggs
Eggs add richness, color, structure, and tenderness.
Because eggs vary in size, use large eggs for the most consistent results.
Butter
Use unsalted butter that has been softened to room temperature.
Softened butter is much easier to incorporate into the dough gradually.
Do not use melted butter unless the recipe has specifically been designed for it. For brioche dough, softened butter gives better structure.
Yeast
Active dry yeast works beautifully. Instant yeast can also be used, although the exact mixing method may vary slightly depending on the brand.
Step 1: Activate the Yeast
Begin by placing the warm milk in a small bowl.
Add the sugar and yeast and gently stir.
Allow the mixture to stand for approximately 5–10 minutes.
If your yeast is active, you should notice some bubbles or foam developing on the surface.
This step is particularly useful when using active dry yeast because it confirms that the yeast is working before you add the remaining ingredients.
The milk should feel comfortably warm to the touch. If it is too hot, allow it to cool before adding the yeast.
Step 2: Combine the Dry Ingredients
While the yeast mixture is resting, add the flour and salt to a large mixing bowl.
Whisk them together briefly.
If you are using vanilla extract, keep it ready to add with the wet ingredients.
The salt should be evenly distributed throughout the flour.
Step 3: Add the Wet Ingredients
Pour the yeast mixture into the flour.
Add the eggs and vanilla extract if using.
Using a wooden spoon, sturdy spatula, or dough hook, mix everything together.
At first, the mixture may look rough and sticky.
Keep mixing until the flour is mostly incorporated and a soft dough begins to form.
Do not worry if it doesn’t look smooth yet.
Step 4: Knead the Dough
If using a stand mixer, attach the dough hook and knead on low to medium speed for several minutes.
If kneading by hand, transfer the dough to a lightly floured work surface and begin working it with your hands.
The dough will initially be sticky.
Resist the temptation to add a lot of flour.
Brioche dough is naturally softer and richer than ordinary bread dough.
Continue kneading until the dough begins to become smoother and more elastic.
Step 5: Add the Butter Gradually
This is one of the most important steps in making brioche.
Add the softened butter a little at a time.
Allow each portion to become incorporated before adding the next.
The dough may appear to become very soft or messy when you first add the butter.
That is completely normal.
Continue kneading until the butter has been fully absorbed and the dough becomes smooth, elastic, and glossy.
This can take several minutes in a stand mixer.
If kneading by hand, it may take longer.
The finished dough should be soft and stretchy.
Step 6: Check the Dough
A useful way to check whether your dough has developed enough gluten is the windowpane test.
Take a small piece of dough and gently stretch it between your fingers.
If you can stretch it thin enough that light passes through without the dough immediately tearing, the gluten structure is well developed.
If it tears easily, continue kneading for a little longer.
Don’t worry if your dough isn’t perfectly smooth. The most important thing is that it has become elastic and cohesive.
Step 7: First Rise
Shape the dough into a loose ball and place it in a lightly greased bowl.
Cover the bowl with plastic wrap, a clean kitchen towel, or a reusable cover.
Place it somewhere warm and allow the dough to rise.
Depending on the temperature of your kitchen, this may take approximately 1–2 hours.
The dough should become noticeably larger.
It doesn’t always have to exactly double in size. The important thing is that it has visibly expanded and feels airy.
Step 8: Gently Deflate the Dough
Once the first rise is complete, gently press down on the dough to release some of the excess gas.
Transfer it to a clean work surface.
Avoid aggressively kneading it at this stage.
The goal is simply to redistribute the dough and prepare it for shaping.
Step 9: Divide the Dough
Divide the dough into equal portions.
For dinner-sized rolls, approximately 12 portions work well.
For smaller rolls, you can divide the dough into 14–16 pieces.
Try to make each piece approximately the same size so they bake evenly.
If you have a kitchen scale, weighing the dough portions is the easiest way to achieve uniform rolls.
Step 10: Shape the Rolls
Take one piece of dough and gently flatten it.
Bring the edges toward the center underneath, creating a smooth top.
Turn the dough over and gently roll it between your palms or against the work surface until it becomes a smooth ball.
Repeat with the remaining pieces.
Place the shaped rolls into a lightly greased baking dish or lined baking tray.
You can arrange them slightly apart for individually shaped rolls, or place them closer together so they bake into soft pull-apart rolls.
Step 11: Second Rise
Cover the shaped rolls loosely.
Allow them to rise again for approximately 30–60 minutes.
They should become noticeably puffy.
This second rise is important because it helps create a light, airy interior.
Avoid rushing this stage.
If the rolls haven’t become puffy enough, give them a little more time.
Step 12: Prepare the Egg Wash
In a small bowl, whisk together one egg and one tablespoon of milk.
This creates a simple egg wash that gives the rolls their beautiful golden finish.
Once the rolls have completed their second rise, gently brush the tops with the egg wash.
Be careful not to press down on the dough while brushing.
Step 13: Add Optional Toppings
If desired, sprinkle the tops with sesame seeds or poppy seeds.
You can also leave them plain.
For a slightly savory finish, a tiny sprinkle of flaky salt can be delicious.
For a sweeter variation, leave off the savory toppings and brush the finished rolls with melted butter after baking.
Step 14: Bake the Brioche Rolls
Preheat your oven to 350°F (175°C).
Place the rolls in the oven and bake for approximately 18–25 minutes, depending on their size and your oven.
The tops should become beautifully golden brown.
The center should be fully baked and the rolls should feel light and soft.
Avoid opening the oven repeatedly during baking because this can allow heat to escape.
Start checking them toward the end of the suggested baking time.
Step 15: Brush With Butter
As soon as the rolls come out of the oven, you can brush their tops with a little melted butter.
This is optional, but it gives them a wonderfully soft, shiny finish.
Allow the rolls to cool for several minutes before serving.
There is nothing wrong with enjoying one while it is still warm.
How to Know When Brioche Rolls Are Done
The tops should be golden brown rather than pale.
The rolls should feel set but still soft.
If you have an instant-read thermometer, the center of a fully baked enriched bread is generally around 190–200°F (88–93°C).
Because oven temperatures can vary, use the appearance and texture of the rolls along with the baking time.
Tips for Soft and Fluffy Brioche Rolls
Don’t Add Too Much Flour
This is probably the most important tip.
Because brioche dough is rich and soft, it can feel sticky during mixing.
Adding excessive flour can produce dense rolls.
Instead, continue kneading and allow the gluten to develop.
Use Soft Butter
Butter should be soft enough to incorporate easily but not melted.
If your butter is too cold, it won’t mix smoothly.
If it is melted, it can make the dough unnecessarily greasy and difficult to handle.
Give the Dough Time
Yeast dough cannot always be rushed.
The rising time depends on the temperature of your kitchen, the freshness of your yeast, and the ingredients.
Look at the dough rather than relying only on the clock.
Don’t Overproof
While you want the rolls to become puffy, letting them rise excessively can cause them to lose structure.
The dough should look airy and expanded but still have enough strength to hold its shape.
Brush Gently
When applying egg wash, use a soft pastry brush and a light touch.
You don’t want to deflate the rolls after they have completed their second rise.
Make-Ahead Method
Brioche rolls are excellent for preparing ahead of time.
You can prepare the dough and allow it to complete the first rise.
Shape the rolls and place them in the baking dish.
Cover them tightly and refrigerate them overnight.
The following day, allow them to sit at room temperature until they become puffy.
Then brush with egg wash and bake.
This method can also improve the flavor because the dough has additional time to develop.
Storage
Store completely cooled rolls in an airtight container or tightly wrapped bag.
They are best enjoyed within a couple of days.
If the rolls become slightly less soft after storage, warm them gently before serving.
A few seconds in the microwave can restore some of their softness.
You can also wrap them in foil and warm them in a low oven.
Freezing Instructions
Milk Brioche Rolls freeze very well.
Allow them to cool completely before freezing.
Place them in a freezer-safe bag or container and remove as much excess air as possible.
Freeze for up to a few months for best quality.
When you’re ready to eat them, allow the rolls to thaw at room temperature.
Warm them gently in the oven before serving.
Delicious Ways to Serve Milk Brioche Rolls
These rolls are incredibly versatile.
Serve them warm with:
- Butter
- Honey
- Strawberry jam
- Raspberry jam
- Orange marmalade
- Peanut butter
- Chocolate spread
- Cream cheese
For a savory meal, serve them alongside:
- Roast chicken
- Turkey
- Soup
- Stew
- Pasta
- Roasted vegetables
- Grilled meats
- Holiday dinners
They also make excellent sandwich rolls.
Slice one horizontally and fill it with eggs and cheese for breakfast, or use it for a small chicken or turkey sandwich.
Turn Them Into French Toast
If you have leftover brioche rolls, don’t throw them away.
Brioche makes excellent French toast because its rich crumb absorbs the custard beautifully.
Slice the rolls, dip them briefly into a mixture of eggs and milk, and cook them in a lightly buttered skillet.
Serve with fresh berries, powdered sugar, yogurt, or a small drizzle of maple syrup.
Make Mini Brioche Rolls
For parties or gatherings, divide the dough into smaller portions.
Mini brioche rolls are perfect for sliders, appetizers, or children’s meals.
You can fill them with chicken, cheese, vegetables, or other sandwich fillings.
Common Questions
Can I use instant yeast?
Yes. Instant yeast can generally be mixed directly with the dry ingredients, although following the instructions on your particular yeast package is recommended.
Can I use plant-based milk?
Yes. Unsweetened plant-based milk can be substituted, although the flavor and richness may differ slightly from traditional whole milk.
Why is my brioche dough sticky?
Brioche dough contains milk, eggs, and butter, so it is naturally softer and stickier than basic bread dough.
Kneading develops gluten and helps the dough become smoother.
Why are my rolls dense?
Dense rolls can result from inactive yeast, insufficient kneading, too much flour, inadequate rising time, or an overly cool environment.
Make sure the yeast is active and allow the dough enough time to become visibly puffy.
Can I make these rolls without eggs?
Eggs contribute significantly to the traditional brioche texture, so removing them will change the recipe. If you need an egg-free version, it is better to use a recipe specifically formulated without eggs.
Final Thoughts
Homemade Milk Brioche Rolls are one of those recipes that make an ordinary meal feel special. The dough is rich with milk, eggs, and butter, creating rolls that are soft, tender, lightly sweet, and wonderfully fragrant.
The process takes some patience, especially during kneading and rising, but the result is well worth the effort. Once you become comfortable with enriched dough, you can use the same basic technique to create different shapes and variations.
Serve them warm from the oven with butter, use them for sandwiches, pair them with dinner, or save a few for breakfast the next morning. Their soft texture and delicate flavor make them a recipe worth keeping in your regular baking rotation.
For the best results, remember the essentials: don’t add too much flour, incorporate the butter gradually, knead until the dough becomes elastic, allow both rises to happen properly, and bake until beautifully golden.
With these simple techniques, you’ll be able to make a batch of soft, fluffy Milk Brioche Rolls that everyone will want to reach for.
Add servings and preparation timesClarify stand mixer and hand-kneading time