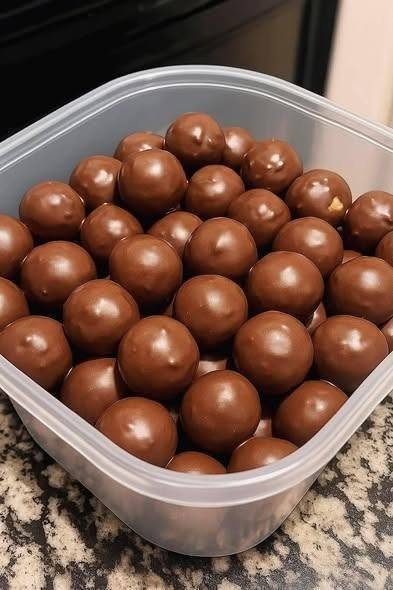

Ingredients
This recipe uses simple ingredients that combine to create a rich peanut butter flavor and a soft, chewy texture.
1 cup (250 g) creamy peanut butter
The main ingredient, providing healthy fats, protein, and a rich nutty flavor. Choose natural or regular peanut butter, preferably well stirred.
½ cup (about 50–60 g) protein powder
Vanilla whey protein or a plant-based protein blend works well. Protein content varies by brand, so check the label.
1 cup (90–100 g) rolled oats
Oats add fiber, texture, and slow-digesting carbohydrates. For a smoother consistency, pulse them in a blender before mixing.
¼ cup (about 85 g) honey
Honey helps bind the mixture and adds sweetness. Maple syrup can be used as an alternative, although the texture may differ.
¼ cup (40–45 g) mini chocolate chips
Dark chocolate chips add a little crunch and balance the salty, nutty peanut butter flavor.
Flavor enhancers
- 1 teaspoon vanilla extract
- A small pinch of salt, optional
- 1–3 tablespoons milk or water, only if needed
Instructions: How to make peanut butter protein balls
Step 1: Mix the dry ingredients
Add the rolled oats and protein powder to a large mixing bowl. Stir thoroughly with a spoon or spatula until evenly combined. Breaking up any protein powder lumps now helps create a smoother mixture.
Step 2: Add the wet ingredients
Add the peanut butter, honey, and vanilla extract to the dry ingredients. Mix until everything is incorporated. The mixture should become thick, slightly sticky, and easy to press together.
Step 3: Fold in the chocolate chips
Stir in the chocolate chips until evenly distributed. If the mixture seems too dry or crumbly, add milk or water one teaspoon at a time. If it feels too sticky, add a little more oats or protein powder.
Step 4: Roll into balls
Scoop approximately 1 tablespoon of mixture and roll it between your palms to form a compact ball. Repeat until you have about 16 evenly sized balls. Lightly damp hands can help prevent sticking.
Step 5: Chill until firm
Place the balls on a parchment-lined tray or in a container. Refrigerate for at least 30 minutes. Chilling helps the oats absorb moisture, firms up the peanut butter, and makes the balls easier to handle.
Step 6: Serve and enjoy
Enjoy the chilled protein balls straight from the refrigerator. For extra flavor, drizzle them with melted dark chocolate or sprinkle a few crushed peanuts on top before serving.
Nutrition information
The following values are estimates for one ball when the recipe makes 16 servings. Actual nutrition depends on your peanut butter, protein powder, honey, and chocolate brands.
| Nutrient | Per ball |
|---|---|
| Calories | 125–145 kcal |
| Protein | 6–8 g |
| Carbohydrates | 10–13 g |
| Fat | 7–9 g |
| Fiber | 1–2 g |
How can you increase the protein?
- Use a protein powder containing 24–25 g protein per serving.
- Choose peanut butter with a higher protein content and minimal added sugar.
- Replace some of the oats with additional protein powder, adding a little liquid if needed.
- Make smaller balls for portion control, or calculate nutrition based on your actual ingredient labels.
Keep in mind that increasing protein powder too much can make the mixture dry or chalky. Adjust gradually to maintain a pleasant, chewy texture.
Helpful tips for perfect protein balls
1. Choose the right peanut butter. A thick, well-stirred peanut butter usually gives the best consistency. If using natural peanut butter, mix the separated oil thoroughly before measuring.
2. Adjust the texture gradually. Protein powders absorb different amounts of liquid. If your mixture crumbles, add a teaspoon of milk at a time. If it sticks excessively to your hands, add a spoonful of oats.
3. Sweeten to your preference. If your protein powder is already sweetened, start with a little less honey and add more only if needed.
4. Make them your own. Try shredded coconut, chopped almonds, chia seeds, cinnamon, or raisins. You can also coat the finished balls in melted dark chocolate for a dessert-style treat.
5. Store them properly. Keep the balls in an airtight container in the refrigerator for up to one week. For longer storage, freeze them for up to three months. Thaw in the refrigerator or let one sit at room temperature briefly before eating.
Flavor variations
Chocolate peanut butter
Add 1–2 tablespoons unsweetened cocoa powder and a little extra liquid if needed.
Coconut peanut butter
Add shredded coconut to the mixture or roll the finished balls in coconut flakes.
Crunchy peanut
Add chopped roasted peanuts for extra crunch and a stronger peanut flavor.
Cinnamon oat
Add ½ teaspoon ground cinnamon for a warm, lightly spiced flavor.
Frequently asked questions
Can I make these protein balls without protein powder?
Yes. Replace the protein powder with additional oats and, if needed, a little milk. However, the protein content will be lower. Powdered peanut butter may help retain more protein than using oats alone, depending on the product.
Are peanut butter protein balls good after a workout?
They can be a convenient post-workout snack because they provide protein, carbohydrates, and fats. Your overall recovery needs depend on the intensity of your exercise and your daily nutritional requirements.
Can I make them vegan?
Yes. Use plant-based protein powder, maple syrup instead of honey, and dairy-free chocolate chips. Check that all other ingredients meet your dietary needs.
Do I need to bake them?
No. These are completely no-bake protein balls. Refrigeration is enough to firm them up, provided the mixture has the right consistency.
Why are my protein balls falling apart?
The mixture may be too dry, often because the protein powder absorbs more moisture than expected. Add a small amount of peanut butter or milk, mix again, and compress the balls firmly before chilling.
Final thoughts
These high-protein peanut butter balls are an easy way to prepare a satisfying snack ahead of time. With creamy peanut butter, oats, protein powder, honey, and chocolate chips, you get a delicious combination of sweetness, chewiness, and nutty flavor without turning on the oven.
Make a batch at the beginning of the week, keep it refrigerated, and enjoy a convenient snack whenever hunger strikes. Whether you prefer them as a quick breakfast bite, a lunchbox treat, or a post-workout snack, this recipe is simple to customize to your taste and nutritional goals.