
Ingredients
- 1 cup creamy peanut butter
- 1/2 cup unsalted butter, softened
- 3/4 cup granulated sugar
- 1/2 cup light brown sugar, packed
- 1 large egg
- 1 teaspoon vanilla extract
- 1 1/4 cups gluten-free all-purpose flour blend
- 1/2 teaspoon baking soda
- 1/4 teaspoon salt
Optional
- 1/2 cup chocolate chips
- 1/3 cup chopped peanuts
- 1/2 teaspoon ground cinnamon
- A little extra sugar for rolling
Important: If you need the cookies to be strictly gluten-free, use ingredients labeled gluten-free and avoid cross-contact with wheat-containing foods.
Step 1: Prepare the Oven
Preheat your oven to 350°F (175°C).
Line a baking sheet with parchment paper.
The parchment paper helps prevent the cookies from sticking and also makes cleanup easier.
If you are baking several batches, keep the unused dough chilled while the first batch is baking.
Step 2: Cream the Butter and Sugars
Place the softened butter in a large mixing bowl.
Add the granulated sugar and brown sugar.
Beat everything together for about 2–3 minutes until the mixture becomes smooth and creamy.
The brown sugar adds moisture and a deeper flavor, while the granulated sugar helps create lightly crisp edges.
Make sure your butter is softened rather than melted. Melted butter can make the cookies spread too much.
Step 3: Add the Peanut Butter
Add the creamy peanut butter to the butter and sugar mixture.
Mix until everything is completely combined.
Use a good-quality creamy peanut butter for a smooth cookie dough.
If you prefer a little texture, you can use crunchy peanut butter instead.
The peanut butter should be well mixed before measuring so that the natural oils are evenly distributed.
Step 4: Add the Egg and Vanilla
Crack the egg into the bowl.
Add the vanilla extract.
Beat again until the mixture becomes smooth.
Scrape down the sides of the bowl with a spatula so that all the ingredients are incorporated evenly.
The mixture may look slightly creamy and thick at this stage.
Step 5: Mix the Dry Ingredients
In a separate bowl, combine:
- Gluten-free flour
- Baking soda
- Salt
Whisk the dry ingredients together.
This distributes the baking soda and salt throughout the flour so that they don’t remain concentrated in one part of the dough.
Step 6: Combine Wet and Dry Ingredients
Gradually add the dry ingredients to the peanut butter mixture.
Mix gently with a spatula or wooden spoon.
Continue mixing just until a soft cookie dough forms.
Do not overmix the dough.
Gluten-free flour can sometimes absorb moisture differently from regular flour, so allow the dough to sit for a few minutes after mixing.
If the dough seems unusually dry, add 1 teaspoon of milk at a time until it becomes easy to scoop.
If the dough is very sticky, refrigerate it for 15–20 minutes.
Step 7: Add Optional Chocolate Chips
If you want chocolate peanut butter cookies, fold chocolate chips into the dough.
You can also add chopped peanuts for extra crunch.
White chocolate chips can also be delicious with peanut butter.
For a simple classic cookie, however, you can leave the dough plain.
Step 8: Chill the Dough
Place the cookie dough in the refrigerator for about 20–30 minutes.
Chilling is especially useful if your dough feels soft.
It helps the cookies maintain their shape during baking and makes the dough easier to handle.
You don’t necessarily need to chill very firm dough for a long time, but a short chilling period can still improve the final texture.
Step 9: Shape the Cookies
Use a cookie scoop or tablespoon to portion the dough.
Roll each portion gently between your palms to form a ball.
Place the dough balls on the prepared baking sheet.
Leave approximately 2 inches of space between them because the cookies will spread while baking.
Don’t overcrowd the baking sheet.
Step 10: Create the Classic Peanut Butter Pattern
For the traditional peanut butter cookie appearance, use a fork.
Press the fork gently across the top of each dough ball.
Then turn the fork and press again in the opposite direction.
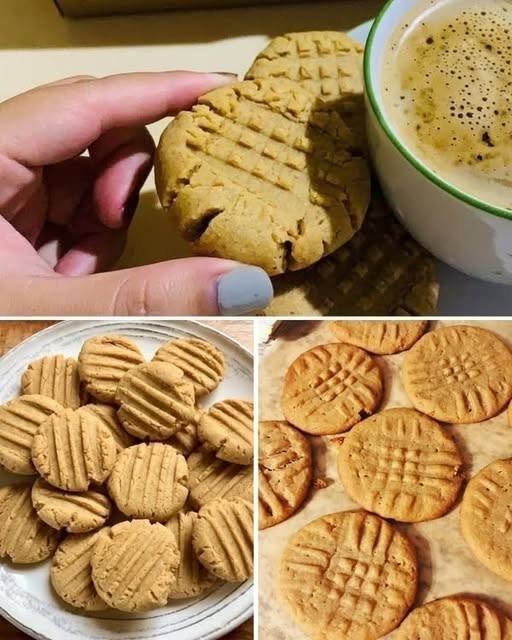
This creates the classic crisscross pattern.
Don’t press too hard. You only need to flatten the cookie slightly.
If the fork sticks to the dough, lightly dip the fork in sugar before pressing.
Step 11: Add a Little Sugar
For slightly crisp, sweet edges, you can sprinkle a small amount of granulated sugar over the cookies.
This step is optional.
The brown and white sugars already provide plenty of sweetness, so you can skip this if preferred.
Step 12: Bake the Cookies
Place the baking sheet in the preheated oven.
Bake for approximately 10–13 minutes.
The edges should look set and lightly golden, while the centers may still appear slightly soft.
Don’t wait until the cookies look completely firm in the oven.
They will continue cooking from the residual heat after being removed.
Overbaking can make gluten-free cookies dry and crumbly.
Step 13: Let Them Cool
Remove the baking sheet from the oven.
Allow the cookies to rest on the baking sheet for about 5 minutes.
They will be fragile when they first come out of the oven.
After 5 minutes, carefully transfer them to a wire rack.
Allow them to cool completely.
As they cool, the centers will become firmer while remaining pleasantly soft.
What Makes These Cookies Gluten-Free?
Traditional peanut butter cookies can be made with wheat flour, but this recipe uses a gluten-free all-purpose flour blend instead.
Different gluten-free flour blends behave differently. Some already contain xanthan gum or another ingredient that helps provide structure.
If your flour blend contains xanthan gum, you generally don’t need to add more.
Always check the package instructions and ingredient list of your particular flour blend.
Tips for Perfect Gluten-Free Peanut Butter Cookies
Measure Flour Carefully
Too much flour can make cookies dry.
For the most consistent results, use a kitchen scale if available. Otherwise, spoon the flour into your measuring cup and level the top rather than scooping directly from the flour bag.
Use Softened Butter
Butter should be soft enough to mix easily but not melted.
If it is melted, the dough may spread too much.
Don’t Overbake
This is one of the most important tips.
The cookies should still look slightly soft in the middle when you remove them from the oven.
They will firm up as they cool.
Chill Soft Dough
If your dough is difficult to shape or feels very soft, refrigerate it before baking.
Use Room-Temperature Egg
A room-temperature egg combines more easily with the butter and peanut butter mixture.
Let the Cookies Cool
Freshly baked cookies are delicate.
Give them several minutes on the baking sheet before transferring them to a cooling rack.
Variations
Chocolate Peanut Butter Cookies
Add 1/2 cup chocolate chips to the dough.
Milk chocolate, semisweet, or dark chocolate chips can all work.
Peanut Butter Chocolate Drizzle
After the cookies have cooled completely, drizzle them with melted chocolate.
Allow the chocolate to set before serving.
Crunchy Peanut Butter Cookies
Use crunchy peanut butter instead of creamy peanut butter.
Add a few tablespoons of chopped roasted peanuts for even more texture.
Cinnamon Peanut Butter Cookies
Add 1/2 teaspoon cinnamon to the dry ingredients.
The subtle warmth of cinnamon pairs nicely with peanut butter.
Peanut Butter Sandwich Cookies
Bake the cookies slightly smaller.
Once completely cool, sandwich two cookies together with a thin layer of peanut butter frosting.
How to Store
Store completely cooled cookies in an airtight container.
They can generally remain fresh at room temperature for several days.
Place parchment paper between layers if you don’t want the cookies sticking together.
For longer storage, you can freeze the baked cookies.
Place them in a freezer-safe container or bag with parchment between the layers.
Thaw them at room temperature before serving.
Freezing the Cookie Dough
You can also freeze the cookie dough.
Shape the dough into individual balls and place them on a tray.
Freeze until firm.
Then transfer the dough balls to a freezer-safe bag or container.
When you’re ready to bake, place the frozen dough balls on a lined baking sheet.
Add the fork crisscross pattern and bake, allowing a little extra baking time if necessary.
This is a convenient way to have homemade cookies ready whenever you want them.
Frequently Asked Questions
Are peanut butter cookies naturally gluten-free?
Peanuts and peanut butter themselves do not naturally contain gluten, but not every peanut butter cookie is gluten-free because many recipes contain wheat flour.
This recipe uses gluten-free flour instead.
Can I use natural peanut butter?
Yes, but natural peanut butter can have more separated oil and may produce a different dough texture.
Stir the peanut butter very thoroughly before measuring.
If the dough is unusually oily or soft, chilling it before baking can help.
Can I make these cookies without brown sugar?
Yes. You can replace the brown sugar with additional granulated sugar, although the texture and flavor will be slightly different.
Brown sugar contributes moisture and a deeper caramel-like flavor.
Why are my cookies crumbly?
Gluten-free cookies can become crumbly if there is too much flour or if they are overbaked.
Measure the flour carefully and remove the cookies when the centers are still slightly soft.
Why did my cookies spread too much?
The butter may have been too warm, the dough may have been too soft, or the baking sheet may have been warm.
Chill the dough before baking and use a cool baking sheet for each batch.
Serving Ideas
These gluten-free peanut butter cookies are delicious with a glass of cold milk, a cup of tea, coffee, or hot chocolate.
For a simple dessert plate, serve them alongside fresh fruit.
You can also crumble the cookies over ice cream or use them as a base for a simple layered dessert.
For parties, make smaller cookies and arrange them on a large serving platter.
They also make a lovely homemade gift when packed in a decorative airtight container.
Final Thoughts
These Gluten-Free Peanut Butter Cookies are an easy homemade treat with a soft center, lightly crisp edges, and plenty of classic peanut butter flavor. They require simple pantry ingredients and don’t involve complicated techniques.
The key to successful cookies is keeping the dough at the right consistency, using a reliable gluten-free flour blend, and avoiding overbaking. The cookies should look just set around the edges while remaining slightly soft in the center when they come out of the oven.
Once cooled, they become wonderfully chewy and flavorful. You can enjoy them exactly as written or customize them with chocolate chips, chopped peanuts, cinnamon, or a chocolate drizzle.
Whether you’re baking for your family, preparing treats for a gathering, or simply craving a homemade cookie, this recipe is an easy and delicious way to make gluten-free peanut butter cookies from scratch. 🥜🍪