
Ingredients
- 3 cups (375 g) all-purpose flour or bread flour
- 1½ teaspoons salt
- 1 teaspoon instant yeast
- 1½ cups (360 ml) warm water
- 1 teaspoon sugar or honey, optional
- 1 tablespoon olive oil, optional
- Extra flour for shaping
- Cornmeal or parchment paper for baking, optional
Choosing the Right Bag
Because the dough will be mixed directly inside the bag, always use a clean, food-safe, sturdy bag designed for food storage.
A large reusable silicone food-storage bag can work particularly well. A heavy-duty food-safe zip-top bag is another option.
Avoid thin bags that can easily tear when you are squeezing and folding the dough.
Make sure there is enough room in the bag for the dough to expand during fermentation.
Step 1: Add the Dry Ingredients
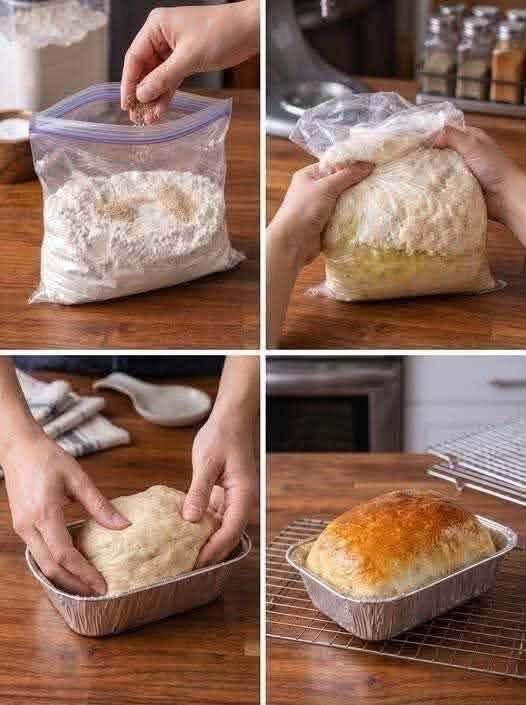
Open your food-safe bag and add the flour, salt, and instant yeast.
If you are using sugar, add it at this stage as well.
Seal the bag, leaving a little air inside, and gently shake it to distribute the ingredients.
This helps spread the yeast and salt throughout the flour before adding the water.
Step 2: Add the Water
Add the warm water to the bag.
The water should be warm rather than hot. Extremely hot water can damage the yeast and interfere with fermentation.
If you are using olive oil, add it now as well.
Seal the bag securely.
Before closing it completely, make sure there is enough room for you to manipulate the dough.
Step 3: Mix the Dough Inside the Bag
Now comes the fun part.
Using your hands, gently squeeze and press the bag to combine the flour and water.
Turn the bag over several times and continue squeezing until there are no large pockets of dry flour.
The dough will initially look rough and sticky.
That’s perfectly normal.
You don’t need to knead it until it becomes smooth. The purpose of this stage is simply to make sure all the ingredients are hydrated.
If you notice dry flour hiding in the corners of the bag, gently work that flour into the dough.
Step 4: Rest the Dough
Once everything is combined, leave the dough inside the sealed bag.
Place the bag in a warm, draft-free area.
Let it rest for approximately 1–2 hours, depending on the temperature of your kitchen.
During this time, the yeast begins fermenting the dough.
The dough should become noticeably larger and more aerated.
Step 5: Give the Dough More Time
For a more flavorful loaf, you can allow the dough to ferment for several hours.
A slower fermentation often produces a more developed flavor and a lighter texture.
Don’t worry if the dough becomes very soft and bubbly.
That is a sign that fermentation is happening.
The exact timing will depend on the amount of yeast, room temperature, and the activity of the yeast.
Step 6: Prepare Your Work Surface
When the dough has risen, lightly flour your countertop.
Open the bag carefully.
The dough may be sticky, so sprinkle a small amount of flour over your hands as needed.
Don’t add excessive flour.
Too much flour can make the finished bread heavy and dry.
Step 7: Remove the Dough
Turn the bag upside down over your floured work surface and gently squeeze the dough out.
Use a dough scraper if necessary.
Try to handle the dough gently so you don’t completely deflate all of the air bubbles created during fermentation.
The dough should feel soft and slightly elastic.
Step 8: Shape the Loaf
Lightly flour the top of the dough.
Fold the outer edges toward the center.
Turn the dough over so the seams are underneath.
Using your hands, gently shape the dough into a round loaf.
You can also make an oval loaf if you prefer.
The goal is to create some surface tension without aggressively kneading the dough.
Step 9: Rest Before Baking
Place the shaped dough on parchment paper or a lightly floured surface.
Cover it loosely with a clean kitchen towel.
Let it rest for approximately 20–30 minutes.
This short resting period gives the gluten time to relax while allowing the dough to puff up slightly before baking.
Step 10: Preheat the Oven
For the best crust, bake this bread in a Dutch oven or another heavy oven-safe covered pot.
Place the Dutch oven inside your oven and preheat it to 230°C / 450°F.
Allow the pot to heat for approximately 30 minutes.
A hot baking vessel helps the bread develop strong oven spring and a crisp crust.
Step 11: Score the Bread
Once the oven and Dutch oven are hot, carefully transfer the dough onto parchment paper if you haven’t already.
Use a sharp knife or bread lame to make one or two cuts across the top.
Scoring gives the expanding dough a controlled place to open during baking.
You can make a simple straight slash or create a decorative pattern.
Step 12: Bake the Bread
Carefully transfer the dough into the hot Dutch oven.
Put the lid on and place the pot in the oven.
Bake covered for approximately 25 minutes.
The steam trapped inside the Dutch oven helps create a beautiful crust while keeping the inside moist.
After 25 minutes, remove the lid.
Continue baking for another 15–20 minutes, or until the bread develops a deep golden-brown crust.
If you prefer a lighter crust, remove the bread a little earlier.
For a darker, crunchier crust, allow it to bake a few extra minutes while keeping a close eye on it.
Step 13: Check for Doneness
A properly baked loaf should feel firm when tapped.
The bottom should sound hollow when gently tapped.
If you use an instant-read thermometer, the center of the loaf should generally be around 95–99°C / 203–210°F when fully baked.
Avoid slicing the bread immediately.
Step 14: Let the Bread Cool
Transfer the finished loaf to a wire rack.
Let it cool for at least 45–60 minutes, preferably longer.
Although the aroma may make it tempting to cut into it immediately, allowing the bread to cool helps the crumb finish setting.
Cutting the loaf while it is extremely hot can result in a gummy interior.
What Makes No-Knead Bread Work?
The secret behind no-knead bread is time.
Traditional bread recipes often develop gluten through mechanical kneading. No-knead recipes take a different approach.
When flour comes into contact with water, gluten-forming proteins begin developing naturally. As the dough rests, fermentation continues and the structure becomes stronger.
The yeast also produces carbon dioxide during fermentation. Those gases become trapped within the developing gluten network, creating the air pockets that give the finished bread its light texture.
That means you can get a beautiful loaf without spending a long time kneading.
Tips for Success
Use the Correct Water Temperature
Water that is too hot can negatively affect the yeast.
Warm water is ideal.
If the water feels comfortably warm to your finger rather than hot, it is generally suitable.
Don’t Add Too Much Flour
Sticky dough does not automatically mean something has gone wrong.
No-knead dough is often wetter than traditional kneaded bread dough.
Use just enough flour to make shaping manageable.
Give It Enough Time
Fermentation is one of the most important parts of bread making.
If your kitchen is cool, the dough may need longer to rise.
If your kitchen is warm, fermentation may happen more quickly.
Watch the dough rather than relying entirely on the clock.
Don’t Skip the Preheating
A properly preheated Dutch oven makes a noticeable difference.
The combination of intense heat and trapped steam helps the bread rise quickly during the first stage of baking.
Flavor Variations
Garlic Herb Bread
Add dried Italian herbs, garlic powder, and a little chopped fresh rosemary to the flour before mixing.
Cheesy No-Knead Bread
Add shredded cheddar, mozzarella, Parmesan, or another firm cheese after the first rise.
Rosemary Olive Bread
Add chopped olives and fresh rosemary for a savory Mediterranean-inspired loaf.
Cinnamon Raisin Bread
For a sweeter version, add raisins, cinnamon, and a little extra sugar.
Honey Wheat Bread
Replace part of the all-purpose flour with whole-wheat flour and add a spoonful of honey.
Because whole-wheat flour absorbs more water, you may need to adjust the hydration slightly.
How to Serve It
Fresh no-knead bread is incredibly versatile.
Serve warm slices with butter for breakfast.
Use it to make sandwiches for lunch.
Toast slices and top them with avocado, eggs, cheese, or roasted vegetables.
It is also excellent alongside soups, stews, pasta, and roasted meats.
For a simple snack, toast a slice and spread it with butter and honey.
The crispy edges and soft center make it satisfying even with very simple toppings.
How to Store Homemade Bread
Once the loaf has cooled completely, store it in a bread bag or paper bag at room temperature.
Avoid storing crusty bread in the refrigerator because refrigeration can make the bread stale more quickly.
For longer storage, slice the loaf and freeze it.
Place the slices into a freezer-safe bag and remove as much excess air as possible.
When you want bread, simply take out a slice and toast it directly from frozen.
Frequently Asked Questions
Can I use all-purpose flour?
Yes. All-purpose flour works very well for this recipe.
Bread flour can give the loaf a slightly chewier structure, but all-purpose flour is a convenient choice.
Can I make this without a Dutch oven?
Yes. A Dutch oven is helpful because it traps steam, but you can also bake the loaf on a preheated baking sheet or baking stone. Adding steam to the oven during the early part of baking can help improve the crust.
Why is my dough very sticky?
No-knead dough is naturally sticky because it contains a relatively high amount of water.
Use lightly floured or damp hands when shaping instead of adding large amounts of flour.
Can I let the dough rise overnight?
Yes. A longer fermentation can develop additional flavor. If you plan to leave the dough for an extended period, use a cooler environment and consider reducing the yeast to prevent over-fermentation.
Can I use instant yeast?
Yes. Instant yeast is convenient because it can be mixed directly with the flour.
How do I know when the dough has finished rising?
Look for a noticeable increase in volume, bubbles, and a lighter, more aerated appearance.
Final Thoughts
This Viral No-Knead Bread in a Bag is a fantastic introduction to homemade bread. The method is simple, the cleanup is minimal, and the result is incredibly rewarding.
The beauty of this recipe is that you don’t need special bread-making skills. You simply mix the ingredients, give the dough enough time to ferment, shape it gently, and bake it in a hot oven.
The finished loaf has a beautifully crisp crust and a soft, airy interior that makes it perfect for almost any meal. Once you’ve tried the basic recipe, you can start experimenting with herbs, cheese, olives, garlic, dried fruit, or even sweet variations.
Whether you’re completely new to bread baking or simply looking for an easy homemade loaf, this no-knead method is one worth keeping in your recipe collection.
Add exact preparation and baking timesClarify the overnight fermentation method