
Ingredients
For one large loaf, you will need:
- 500 g bread flour
- 350 g water
- 100 g active sourdough starter
- 10 g salt
- Extra flour for shaping
- Rice flour or regular flour for dusting
- Parchment paper for baking
For the best results, use a sourdough starter that has recently been fed and is active, bubbly, and strong enough to rise the dough.
Equipment
You do not need a lot of equipment, but these items can make the process easier:
- Large mixing bowl
- Kitchen scale
- Dough scraper
- Clean kitchen towel
- Banneton basket or medium bowl
- Sharp knife or bread lame
- Dutch oven with a lid
- Cooling rack
- Parchment paper
A kitchen scale is particularly useful because sourdough baking is more accurate when ingredients are measured by weight.
Step 1: Make Sure Your Starter Is Active
Before starting the bread, make sure your sourdough starter is active and ready to use.
A healthy starter should be bubbly and have increased in volume after feeding. It should look light and airy rather than flat and inactive. If your starter has been sitting in the refrigerator, you may need to feed it before using it.
The strength of your starter is very important because the starter provides the natural leavening for the bread. If the starter is weak, the dough may take much longer to rise or may not rise properly.
For the best results, use the starter when it is near its peak activity.
Step 2: Mix the Flour and Water
Place 500 g of bread flour into a large bowl.
Add 350 g of lukewarm or room-temperature water. Mix the flour and water together using your hands, a wooden spoon, or a dough scraper.
Continue mixing until all the flour has absorbed the water. Make sure there are no dry patches of flour remaining.
At this stage, the dough will look rough and shaggy. It does not need to look smooth yet.
Cover the bowl with a clean kitchen towel or reusable cover and let the dough rest for about 30–60 minutes.
This resting period allows the flour to absorb the water and helps gluten begin developing naturally.
Step 3: Add the Sourdough Starter
After the resting period, add 100 g of active sourdough starter.
Use wet hands to gently mix the starter into the dough. You can squeeze and fold the dough repeatedly until the starter is evenly distributed.
Take your time during this step. The dough may feel sticky, but that is normal.
Once the starter is fully incorporated, cover the bowl again and let the dough rest for about 20–30 minutes.
Step 4: Add the Salt
Add 10 g of salt to the dough.
Wet your hands and gently work the salt into the dough. You can pinch the dough with your fingers and fold it repeatedly until the salt has disappeared into the mixture.
Salt is important because it adds flavor and also helps strengthen the dough structure.
Once the salt has been incorporated, cover the dough and prepare for the stretch-and-fold stage.
Step 5: Stretch and Fold the Dough
Stretching and folding is one of the most important parts of sourdough preparation.
Instead of kneading the dough like traditional bread dough, sourdough can be strengthened through a series of gentle folds.
With wet hands, grab one side of the dough. Gently stretch it upward without tearing it, then fold it over the center.
Turn the bowl slightly and repeat the process.
Continue until you have folded all four sides of the dough.
Cover the bowl and let it rest for approximately 30 minutes.
Repeat the stretch-and-fold process every 30 minutes for about 3–4 rounds.
As you continue folding, you will notice the dough becoming smoother, stronger, and more elastic.
Step 6: Bulk Fermentation
After the final stretch and fold, leave the dough covered at room temperature for bulk fermentation.
This is the stage when the sourdough starter produces gases that help the dough rise.
The exact fermentation time depends on the temperature of your kitchen and the strength of your starter. It may take approximately 4–8 hours.
Do not rely only on the clock. Look at the dough.
The dough should become:
- Noticeably larger
- Puffy and airy
- Smoother
- Slightly jiggly
- Filled with some bubbles
- More elastic than when you first mixed it
You do not necessarily need the dough to double completely in size.
If your kitchen is warm, fermentation may happen faster. If your kitchen is cool, it may take longer.
Step 7: Prepare Your Work Surface
Once bulk fermentation is complete, lightly flour your work surface.
Avoid using a huge amount of flour because too much flour can make it difficult to create tension on the outside of the loaf.
Use a dough scraper to gently loosen the dough from the bowl.
Carefully turn the dough onto your work surface.
Try not to press or punch the dough because you want to preserve the air bubbles that developed during fermentation.
Step 8: Shape the Loaf
Begin shaping the dough into a round loaf.
Gently stretch one side of the dough and fold it toward the center. Continue around the dough until you have created a compact shape.
Turn the dough over so the seam is underneath.
Using your hands or a dough scraper, gently pull the dough toward you across the work surface.
This helps create surface tension.
The outside of the dough should become smooth and slightly tight.
Do not rush this step. The goal is to create a loaf that can hold its shape while it undergoes the final proof.
Step 9: Prepare the Banneton
Generously dust a banneton basket with rice flour or regular flour.
If you do not have a banneton, use a medium-sized bowl lined with a clean kitchen towel.
Dust the towel generously with flour.
Place the shaped dough into the basket or bowl with the seam facing upward.
Cover the dough.
Step 10: Cold Proof the Dough
Place the covered dough into the refrigerator.
Let it proof for approximately 8–14 hours.
Overnight refrigeration is very convenient because you can prepare the dough in the evening and bake it the next morning.
Cold fermentation also helps develop a deeper sourdough flavor.
The dough will continue to develop while it rests in the refrigerator, although fermentation happens much more slowly because of the cold temperature.
Step 11: Preheat the Oven
When you are ready to bake, place your Dutch oven inside your oven.
Preheat the oven to 240°C / 465°F.
Allow the Dutch oven to heat for around 30–45 minutes.
A properly preheated Dutch oven helps create the hot environment needed for excellent oven spring.
The lid also traps steam during the beginning of baking, helping the bread develop a beautiful crust.
Step 12: Turn Out the Dough
Take the dough from the refrigerator.
Place a sheet of parchment paper on your work surface.
Carefully turn the dough onto the parchment paper.
The dough should now have a smooth, cold surface.
Try to handle it gently so you do not remove all the air that developed during fermentation.
Step 13: Score the Bread
Use a very sharp knife or bread lame to score the top of the dough.
Make one confident slash across the surface.
Scoring gives the expanding bread a controlled place to open during baking.
You can also create simple decorative patterns if you want to make your loaf look special.
Do not make many deep cuts because they can affect how the loaf expands.
Step 14: Bake the Sourdough
Carefully remove the hot Dutch oven from the oven.
Using the parchment paper, lower the dough into the Dutch oven.
Put the lid on immediately.
Bake at 240°C / 465°F for approximately 20 minutes with the lid on.
The covered environment traps steam and helps the bread rise.
After 20 minutes, carefully remove the lid.
Reduce the oven temperature to approximately 220°C / 425°F.
Continue baking for another 20–25 minutes.
The bread should develop a deep golden-brown crust.
If you prefer a darker and crunchier crust, you can bake it for a few additional minutes while keeping a close eye on it.
Step 15: Cool the Bread
When the bread is finished, carefully remove it from the Dutch oven.
Place it on a wire cooling rack.
This is one of the hardest parts because the bread will smell amazing!
However, try not to cut it immediately.
Allow the loaf to cool for at least 1–2 hours.
The inside continues to set as the bread cools. Cutting it too early can result in a gummy or slightly wet crumb.
Once completely cooled, use a serrated bread knife to slice it.
What Makes Sourdough Bread Special?
Sourdough bread is different from many standard breads because it uses a fermented starter.
The starter contains wild yeast and beneficial microorganisms that naturally ferment the dough.
This slow fermentation creates the characteristic flavor and texture associated with sourdough.
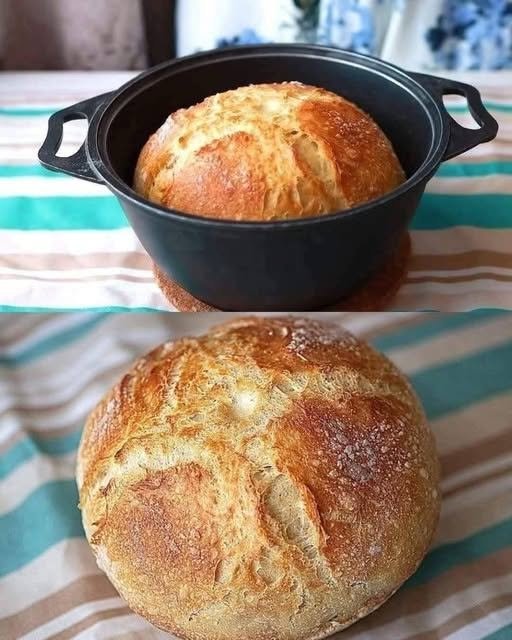
A well-made loaf should have a crisp crust on the outside and a soft, chewy interior with an open crumb.
The flavor can range from mild and slightly tangy to more pronounced and sour, depending on the starter, flour, fermentation time, and temperature.
Common Sourdough Problems
Dough Is Too Sticky
Sourdough dough can naturally be sticky, especially when using a higher hydration.
Avoid adding large amounts of flour. Instead, wet your hands when handling the dough.
With proper folding, the dough should become easier to manage.
Bread Does Not Rise
One common reason is an inactive starter.
Make sure your starter is bubbly and active before using it.
Another possibility is insufficient fermentation. If your kitchen is cool, the dough may need additional time.
Bread Spreads Out
If the dough spreads rather than holding its shape, it may have been over-fermented, under-strengthened, or insufficiently shaped.
Make sure you complete the stretch-and-fold process and create enough surface tension during shaping.
Bread Is Gummy Inside
A gummy center can happen if the loaf was underbaked or sliced while still hot.
Bake until the crust is deeply golden and allow the bread to cool completely before slicing.
How to Store Sourdough Bread
Once cooled, store the bread at room temperature in a bread bag, paper bag, or clean cloth.
Avoid sealing freshly baked sourdough in an airtight plastic bag while it is still warm because trapped moisture can soften the crust.
For longer storage, you can slice the bread and freeze it.
Place the slices in a freezer-safe container or bag and remove individual slices as needed.
Delicious Ways to Enjoy Sourdough
Fresh sourdough bread is delicious in many ways.
You can serve it with:
- Butter and honey
- Scrambled or fried eggs
- Cheese
- Avocado
- Tomato and herbs
- Soup
- Chicken salad
- Tuna salad
- Peanut butter
- Jam
- Garlic butter
You can also toast leftover sourdough and use it to make sandwiches, French toast, croutons, breadcrumbs, or garlic toast.
Final Tips for Perfect Sourdough
The most important thing to remember is that sourdough baking is about learning to recognize the dough.
Temperature, flour, starter strength, and humidity can all affect fermentation.
Do not worry if your first loaf is not perfect. Every batch teaches you something.
Use an active starter, measure your ingredients accurately, give the dough enough time to ferment, perform your folds gently, shape carefully, and allow the finished bread to cool completely.
With practice, you will become better at judging when your dough is ready.
Final Result
This homemade sourdough bread gives you a beautifully crisp crust and a soft, chewy center with a naturally developed flavor. The overnight cold proof makes the process convenient and helps create a delicious loaf that is perfect for breakfast, sandwiches, toast, or serving alongside your favorite soup.
Once you become comfortable with this basic recipe, you can experiment with whole wheat flour, seeds, herbs, roasted garlic, cheese, olives, or other additions. Sourdough is incredibly versatile, and learning the basic method gives you a foundation for many different homemade bread recipes.
The key is patience, an active starter, proper fermentation, gentle handling, and a hot oven. Follow these steps carefully, and you can enjoy fresh, bakery-style sourdough bread straight from your own kitchen.