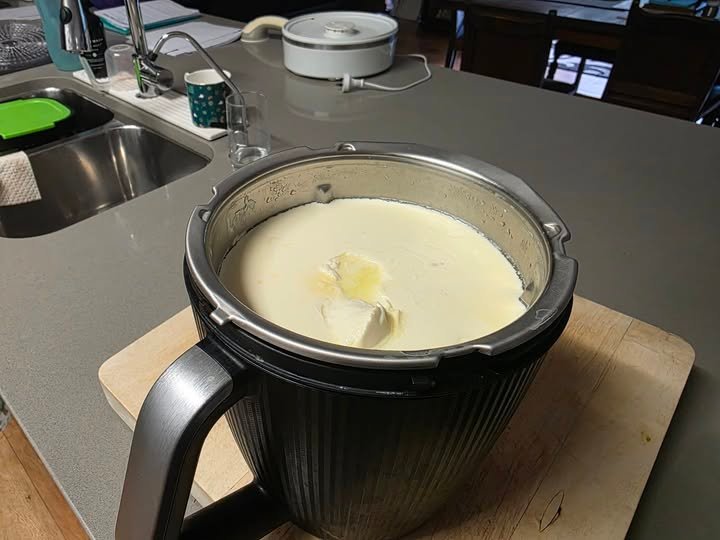

Ingredients
- 1 liter full-fat milk
- 2 tablespoons plain natural yogurt with live cultures
- 2 tablespoons milk powder, optional
- 1 tablespoon honey or sugar, optional
- 1 teaspoon vanilla extract, optional
For the best basic yogurt, start with just milk and live-culture yogurt. Sweeteners and flavorings can be added after the yogurt has finished fermenting.
Step 1: Prepare the Thermomix Bowl
Before beginning, make sure the Thermomix bowl, lid, and accessories are clean. Yogurt depends on live bacterial cultures, so keeping your equipment clean helps prevent unwanted bacteria from affecting the final result.
You do not need to sterilize everything excessively, but wash the bowl and utensils thoroughly and make sure there is no leftover food, oil, or strong flavor from a previous recipe.
Step 2: Add the Milk
Pour 1 liter of full-fat milk into the Thermomix bowl.
Full-fat milk usually produces a richer and creamier yogurt. Lower-fat milk can also work, but the finished yogurt may be thinner.
If you want a particularly thick yogurt, add 2 tablespoons of milk powder.
The milk powder increases the milk solids and can help create a thicker, more spoonable yogurt without needing to strain it.
Step 3: Heat the Milk
Heat the milk according to your Thermomix model’s yogurt method. For a traditional heated-milk method, the milk can be heated to approximately 90°C and held there for around 10–20 minutes with gentle stirring.
This heating step changes some of the milk proteins and can help the finished yogurt develop a firmer texture.
Avoid using high-speed mixing because you do not want to create a lot of foam.
Step 4: Cool the Milk
This is one of the most important steps.
After heating, allow the milk to cool to approximately 37–40°C.
Do not add your yogurt starter while the milk is very hot. Excessive heat can damage or kill the live cultures that are needed to turn the milk into yogurt.
If your Thermomix has a temperature display, use it to monitor the cooling process.
You can leave the bowl to cool naturally, or carefully speed the cooling process by placing the bowl in a cool area.
Step 5: Add the Yogurt Starter
Once the milk has cooled to the appropriate temperature, add:
2 tablespoons plain yogurt containing live cultures.
Choose fresh, plain yogurt rather than a flavored yogurt.
The yogurt acts as the starter culture. The beneficial bacteria in the starter multiply during fermentation and transform the milk into yogurt.
If you regularly make homemade yogurt, you can use a few tablespoons of a successful previous batch as the starter for the next batch.
Step 6: Mix Gently
Mix the starter into the warm milk gently for a few seconds.
You want the yogurt to be evenly distributed throughout the milk, but there is no need for aggressive mixing.
Scrape around the sides of the bowl if necessary so that everything is incorporated.
Step 7: Begin Fermentation
This is where the magic happens.
If your Thermomix model has a Yogurt or Fermentation mode, use the yogurt program according to your model’s instructions.
The mixture generally needs to remain warm for approximately 8 hours, although fermentation time can vary.
During this period, the live cultures multiply and convert lactose into lactic acid. This gradually thickens the milk and gives yogurt its characteristic slightly tangy flavor.
Try not to disturb the mixture while it is fermenting.
Step 8: Let the Yogurt Rest
Once fermentation begins, leave the yogurt completely undisturbed.
Avoid opening the container repeatedly or stirring the mixture during fermentation.
Every time the container is moved, the developing yogurt structure can be disturbed.
For a mild yogurt, around 8 hours is often a good starting point.
For a more tangy yogurt, you can allow a longer fermentation, provided your Thermomix model and recipe method support it.
Step 9: Check the Yogurt
After fermentation, carefully check the yogurt.
It should look noticeably thicker than milk. The surface may have a smooth, set appearance, and there may occasionally be a small amount of whey around the edges.
Don’t worry if it doesn’t look extremely thick while warm.
Yogurt usually becomes considerably firmer after refrigeration.
Step 10: Refrigerate
Transfer the yogurt to clean containers or jars.
Place the containers in the refrigerator and allow the yogurt to chill for at least 4 hours.
For an even better texture, refrigerate it overnight.
The cold temperature helps the yogurt firm up and develop a smoother consistency.
Try not to stir the yogurt before it has completely chilled.
Step 11: Make Greek-Style Yogurt
If you prefer thick Greek-style yogurt, strain the finished chilled yogurt.
Place a fine-mesh strainer over a bowl and line it with clean cheesecloth or a suitable yogurt-straining cloth.
Pour the yogurt into the strainer and place everything in the refrigerator.
Allow it to drain for approximately 2–4 hours, depending on how thick you want it.
The liquid that drains away is whey.
The longer you strain the yogurt, the thicker it becomes.
For an especially thick, spreadable consistency, you can strain it for longer.
Step 12: Add Flavor
It is best to flavor the yogurt after fermentation rather than before.
Once chilled, you can mix in:
- Honey
- Maple syrup
- Vanilla
- Fresh strawberries
- Blueberries
- Mango
- Banana
- Cinnamon
- Chia seeds
- Crushed nuts
- Homemade fruit compote
For a simple breakfast, spoon the yogurt into a bowl and add fresh fruit, nuts, and a small drizzle of honey.
Step 13: Make Creamy Fruit Yogurt
For homemade fruit yogurt, add chilled homemade yogurt to a bowl.
Add finely chopped fresh fruit or a spoonful of fruit puree.
Mix gently until the fruit is distributed throughout the yogurt.
Strawberry, blueberry, mango, peach, and banana are particularly good choices.
If you are using juicy fruit, add it gradually so the yogurt does not become watery.
Step 14: Make a Breakfast Yogurt Bowl
Add homemade yogurt to a bowl.
Top with sliced banana, berries, nuts, seeds, and granola.
For extra flavor, add a little cinnamon or vanilla.
This makes a quick breakfast that requires almost no preparation.
Step 15: Use It in Smoothies
Homemade yogurt is excellent for smoothies.
Add yogurt, fruit, and milk to a blender or Thermomix.
You can use strawberries, blueberries, bananas, mango, or other fruits you enjoy.
The yogurt gives the smoothie a creamy texture.
Step 16: Use It in Savory Recipes
Plain homemade yogurt is also useful in savory dishes.
You can mix it with garlic, lemon juice, salt, and herbs to create a simple yogurt sauce.
It works well with grilled vegetables, wraps, roasted potatoes, and many other meals.
Tips for Extra-Thick Yogurt
Use full-fat milk
Full-fat milk generally gives a richer texture.
Add milk powder
Adding a couple of tablespoons of milk powder can help increase the solids and produce thicker yogurt.
Use a good starter
Choose fresh plain yogurt that clearly contains live cultures.
Keep the temperature stable
Consistent warmth during fermentation is important for reliable results.
Don’t disturb the yogurt
Avoid stirring or moving the mixture unnecessarily while it is fermenting.
Chill thoroughly
The yogurt becomes firmer as it cools, so give it enough time in the refrigerator.
Strain it
If you want very thick Greek-style yogurt, straining is the most reliable way to remove excess whey.
Troubleshooting
My yogurt is too thin
There are several possible reasons.
The milk may not have been heated sufficiently during the initial heating step, the starter may have been too old, the fermentation temperature may not have been suitable, or the yogurt may simply need more chilling time.
Try refrigerating it overnight before deciding that it has failed.
You can also strain it to remove excess whey.
My yogurt is very sour
It may have fermented for too long.
Next time, try a shorter fermentation period.
My yogurt has liquid on top
A small amount of whey is normal.
Simply pour off some of the whey or stir it back into the yogurt.
For thicker yogurt, strain it.
My yogurt didn’t set
Check that your starter yogurt contained live cultures.
Also make sure the milk was not too hot when the starter was added.
If the mixture remained completely liquid after a suitable fermentation period, it may be best to discard it rather than attempting to rescue it.
How to Store Homemade Yogurt
Keep homemade yogurt covered in the refrigerator.
For best quality, use it within approximately 5–7 days.
Always use clean utensils when serving it.
If you notice an unusual smell, visible mold, or other signs of spoilage, discard the yogurt.
How to Save Starter for Your Next Batch
Once you have made a successful batch, you can reserve a small amount of plain yogurt to use as the starter for your next batch.
Place a few tablespoons in a clean, covered container and refrigerate it.
For the next batch, add the starter to properly cooled milk.
Using a fresh, active starter generally gives more reliable results.
Final Result
Homemade Thermomix yogurt is creamy, fresh, versatile, and surprisingly easy to make. The key points are clean equipment, properly