
Ingredients
For the Chocolate Custard
- 2 cups whole milk
- 1/2 cup heavy cream
- 1/2 cup granulated sugar
- 1/4 cup unsweetened cocoa powder
- 3 tablespoons cornstarch
- 1/4 teaspoon salt
- 100 g semi-sweet or dark chocolate, finely chopped
- 1 teaspoon vanilla extract
- 1 tablespoon butter
For the Optional Biscuit Layer
- 150 g chocolate biscuits or digestive biscuits
- 3 tablespoons melted butter
For the Topping
- Whipped cream
- Chocolate shavings
- Cocoa powder
- Fresh berries
- Mini chocolate chips
- Chopped nuts
Equipment
You will need:
- Medium saucepan
- Whisk
- Mixing bowl
- Food processor or rolling pin, if making the biscuit layer
- Serving glasses or one medium dessert dish
- Plastic wrap
- Refrigerator
Step 1: Prepare the Biscuit Base
The biscuit base is optional, but it adds a delicious crunchy contrast to the creamy custard.
Place the chocolate biscuits in a food processor and crush them into fine crumbs.
If you don’t have a food processor, put the biscuits into a sealed bag and crush them with a rolling pin. Try to make the crumbs fairly fine so the base holds together.
Transfer the crumbs to a bowl.
Add the melted butter and mix thoroughly. The crumbs should look slightly damp and resemble wet sand.
If the mixture seems too dry, add another small amount of melted butter.
Step 2: Make the Biscuit Layer
Spoon some of the biscuit mixture into the bottom of individual serving glasses.
Press it down gently with the back of a spoon.
You don’t need to make the layer extremely thick. A thin layer provides enough crunch without overpowering the chocolate custard.
Place the glasses in the refrigerator while you prepare the custard.
If you are using one large dish, spread the biscuit mixture evenly over the bottom and press it down gently.
Step 3: Combine the Dry Ingredients
Now it’s time to prepare the chocolate custard.
Add the sugar, cocoa powder, cornstarch, and salt to a medium saucepan.
Whisk the dry ingredients together.
This step is important because mixing the cocoa powder and cornstarch with the sugar first helps distribute them evenly.
It also reduces the chance of cornstarch lumps forming later.
Step 4: Add the Milk Gradually
Slowly pour the milk into the saucepan while whisking continuously.
Don’t pour all the milk in at once if you can avoid it. Adding it gradually makes it easier to create a smooth mixture.
Continue whisking until the cocoa powder and cornstarch are completely incorporated.
The mixture should be smooth and fairly thin at this stage.
Step 5: Add the Heavy Cream
Pour the heavy cream into the saucepan.
Whisk again until everything is evenly combined.
The cream gives the custard a richer and smoother texture.
If you don’t have heavy cream, you can use additional whole milk, although the finished custard will be slightly lighter.
Step 6: Begin Cooking
Place the saucepan over medium-low to medium heat.
Start whisking continuously.
As the mixture heats, the cornstarch will begin thickening the liquid.
Don’t walk away from the saucepan during this stage because the mixture can thicken quickly once it reaches the right temperature.
Step 7: Keep Whisking
Continue stirring and whisking as the custard heats.
At first, the mixture will look almost unchanged.
Then it will gradually become thicker.
Make sure your whisk reaches the bottom and corners of the saucepan so the custard doesn’t stick.
Lower the heat slightly if the mixture begins cooking too quickly.
Step 8: Look for the Right Consistency
The custard is ready when it becomes noticeably thick and coats the back of a spoon.
You should be able to run your finger through the custard on the back of the spoon and see a clear line.
The mixture should be smooth and glossy.
Don’t worry if it still seems slightly softer than you want. It will become thicker as it cools.
Step 9: Add the Chocolate
Remove the saucepan from the heat.
Immediately add the chopped chocolate.
Let it sit in the hot custard for about 30 seconds.
Then whisk gently until the chocolate has completely melted.
The custard should become darker, smoother, and richer.
Using finely chopped chocolate helps it melt quickly and evenly.
Step 10: Add Butter and Vanilla
Add the butter and vanilla extract.
Whisk until the butter has melted completely.
The butter adds a smooth, silky finish, while vanilla enhances the chocolate flavor.
Taste a small amount once it has cooled slightly.
If you prefer a sweeter dessert, you can adjust the sweetness next time by adding a little more sugar.
Step 11: Strain the Custard
For an extra-smooth custard, pour the mixture through a fine-mesh sieve into a clean bowl.
This step is optional, but it can remove any tiny lumps of cocoa or cornstarch.
If you cooked the custard carefully and it looks perfectly smooth, you can skip this step.
Step 12: Fill the Dessert Glasses
Take the chilled biscuit bases out of the refrigerator.
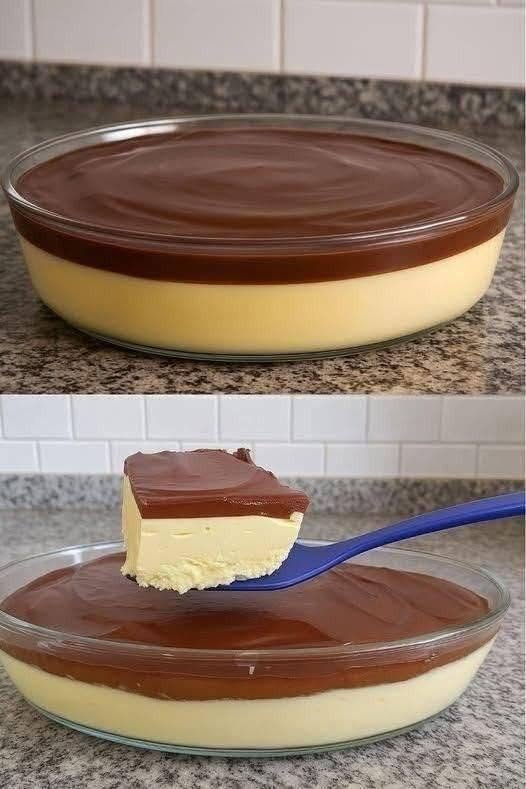
Slowly spoon or pour the warm chocolate custard over the biscuit layer.
Fill each glass evenly.
Try not to pour too quickly because you want the biscuit base to remain in place.
Smooth the tops with the back of a spoon.
Step 13: Cover the Custard
Cover each glass with plastic wrap.
For the smoothest surface, gently press the plastic wrap directly against the surface of the custard.
This helps prevent a skin from forming while the dessert cools.
If you’re using a large dish, cover the entire surface in the same way.
Step 14: Chill the Dessert
Place the desserts in the refrigerator.
Allow them to chill for at least 3–4 hours.
For the best texture, you can refrigerate them overnight.
As the custard cools, it will become thicker and creamier.
Avoid trying to serve it immediately after cooking because it won’t have the proper chilled custard texture yet.
Step 15: Prepare the Toppings
Once the custard is completely chilled, prepare your toppings.
You can keep the dessert simple with whipped cream and chocolate shavings.
For a more decorative presentation, add fresh berries, chopped nuts, mini chocolate chips, or a light dusting of cocoa powder.
Step 16: Decorate
Remove the plastic wrap from the chilled desserts.
Add a small spoonful or swirl of whipped cream to each serving.
Sprinkle chocolate shavings over the top.
You can also add a few fresh berries for color and a refreshing contrast to the rich chocolate.
Don’t overload the dessert with toppings. The creamy chocolate custard should remain the main attraction.
Step 17: Serve
Serve the chocolate custard cold.
Use small dessert spoons so everyone can enjoy the creamy texture slowly.
The biscuit layer provides a slightly crunchy base, while the chocolate custard is smooth and rich.
Each bite combines chocolate, creaminess, and a little crunch.
Tips for Perfect Chocolate Custard
Use good-quality cocoa powder
Because chocolate is the main flavor, cocoa powder makes a noticeable difference.
Unsweetened cocoa powder works best for this recipe.
Chop the chocolate finely
Finely chopped chocolate melts more quickly and gives you a smoother custard.
Don’t use high heat
Cooking the custard over very high heat can cause it to stick or develop lumps.
Medium-low to medium heat gives you better control.
Keep whisking
Continuous whisking helps prevent lumps and keeps the custard smooth.
Don’t skip the chilling time
The custard needs time to cool and set.
At least three hours is recommended, but overnight chilling gives an especially nice texture.
Delicious Variations
Chocolate Orange Custard
Add a little finely grated orange zest to the custard while cooking.
Chocolate and orange make a wonderful combination.
Chocolate Mint Custard
Add a tiny amount of peppermint extract along with the vanilla.
Be careful because peppermint extract can be quite strong.
Chocolate Peanut Butter Dessert
Add a spoonful of smooth peanut butter to the warm custard after removing it from the heat.
Whisk until completely incorporated.
Chocolate Coconut Custard
Replace some of the regular milk with coconut milk.
Top the finished dessert with toasted coconut.
Triple Chocolate Custard
Use chocolate biscuits for the base, chocolate custard in the middle, and chocolate shavings on top.
This is perfect for serious chocolate lovers.
Make-Ahead Instructions
This dessert is excellent for preparing ahead.
You can make it the day before serving and keep it covered in the refrigerator.
In fact, allowing the dessert to chill overnight can improve the texture because the custard has more time to fully set.
Add whipped cream and decorative toppings shortly before serving for the freshest appearance.
Storage
Keep leftover chocolate custard covered and refrigerated.
It is best enjoyed within 3–4 days.
Do not leave the dessert sitting at room temperature for extended periods, especially because it contains dairy.
Frequently Asked Questions
Can I make this dessert without the biscuit base?
Yes. Simply pour the chocolate custard directly into serving glasses and chill.
Can I use milk chocolate?
Yes, although milk chocolate will make the dessert sweeter. You may want to slightly reduce the sugar.
Can I use dark chocolate?
Absolutely. Dark chocolate gives the custard a deeper and more intense chocolate flavor.
Can I make it without heavy cream?
Yes. You can replace the heavy cream with additional whole milk. The custard will still work, but it will be somewhat lighter.
Why did my custard become lumpy?
Lumps can happen if the cornstarch isn’t properly mixed or if the custard is heated too quickly. Whisking continuously and starting with cold milk helps prevent this.
If your custard does develop small lumps, passing it through a fine-mesh sieve while warm can help make it smooth.
How long does it need to chill?
Allow at least 3–4 hours for a properly chilled dessert. Overnight is even better.
Serving Suggestions
For a beautiful dessert table, serve the custard in small clear glasses.
Layer the dessert with:
Chocolate biscuit crumbs → Chocolate custard → Whipped cream → Chocolate shavings → Fresh berries
You can also create several layers of biscuit crumbs and custard for a more dramatic presentation.
For a simple family dessert, prepare it in one large dish and spoon individual portions onto plates.
Final Thoughts
This No-Bake Chocolate Custard Dessert is proof that you don’t need an oven to create something delicious and impressive. The recipe uses simple ingredients and straightforward steps, but the result feels rich and special.
The silky chocolate custard is the star of the dessert, while the optional biscuit layer adds a pleasant contrast. A little whipped cream and chocolate shavings on top make it beautiful enough for celebrations, yet the recipe is easy enough to prepare for an ordinary family dinner.
Once you’ve made the basic version, you can experiment with different toppings and flavors. Try chocolate and orange, chocolate and coconut, peanut butter chocolate, or even a simple berry topping.
Prepare it a few hours ahead, let it chill until perfectly creamy, decorate just before serving, and enjoy a delicious no-bake chocolate dessert that is rich, smooth, and wonderfully satisfying.