
Ingredients
For approximately 6 mini sourdough loaves:
- 100 g active sourdough starter
- 350 g lukewarm water
- 500 g bread flour
- 10 g salt
- 15 g honey or sugar
- 20 g olive oil or softened butter
- Extra flour for shaping
- Rice flour or flour for dusting
- Parchment paper
You can increase or decrease the recipe depending on how many mini loaves you want to make.
Equipment
You will need:
- Large mixing bowl
- Kitchen scale
- Dough scraper
- Clean kitchen towel
- Baking tray
- Parchment paper
- Sharp knife or bread lame
- Cooling rack
A Dutch oven can also be used if you want to bake the mini loaves in a covered environment, but a regular baking tray works well too.
Step 1: Prepare Your Sourdough Starter
Before beginning, make sure your sourdough starter is active.
An active starter should look bubbly and airy and should have risen after feeding. If your starter is weak or has been sitting unused for a long time, feed it and allow it to become active before making the dough.
Your starter is one of the most important ingredients in this recipe because it provides the natural fermentation that helps the mini loaves rise.
For the best results, use the starter when it is lively and showing plenty of bubbles.
Step 2: Mix the Flour and Water
Place 500 g of bread flour into a large mixing bowl.
Pour in 350 g of water.
Mix using your hands, a wooden spoon, or a dough scraper until all of the flour is moistened.
There should not be any dry flour remaining.
The dough will look rough and shaggy at this stage. That is completely normal.
Cover the bowl with a clean towel or reusable cover and allow the mixture to rest for approximately 30–60 minutes.
This resting period helps the flour absorb the water and begins gluten development.
Step 3: Add the Starter
After the resting period, add 100 g of active sourdough starter.
Add the honey or sugar as well.
Using wet hands, gently mix the starter throughout the dough.
You can squeeze the dough between your fingers and fold it repeatedly until the starter is evenly incorporated.
The dough may feel sticky, but avoid adding large amounts of extra flour.
Cover and allow the dough to rest for another 20–30 minutes.
Step 4: Add the Salt and Oil
Add 10 g of salt and 20 g of olive oil or softened butter.
Work the ingredients into the dough using your hands.
Continue folding and squeezing gently until everything is well incorporated.
The dough should gradually become smoother and more cohesive.
Cover the bowl again.
Step 5: Stretch and Fold
Stretch-and-folds help build strength in the dough without requiring traditional kneading.
After about 30 minutes, wet your hands.
Grab one side of the dough and gently stretch it upward.
Fold it over the center.
Turn the bowl and repeat with another side.
Continue until you have folded all four sides.
Cover the dough and let it rest for another 30 minutes.
Repeat this process approximately 3–4 times.
Each round should make the dough feel stronger and smoother.
Step 6: Bulk Fermentation
After your final stretch-and-fold, cover the dough and leave it at room temperature.
Allow it to ferment for approximately 4–8 hours, depending on your kitchen temperature and starter strength.
Do not rely only on the clock.
Look at the dough.
It should become:
- Puffy
- Smooth
- Airy
- Slightly jiggly
- Larger in volume
- Filled with some bubbles
If your kitchen is warm, fermentation may happen more quickly.
If your kitchen is cool, it may take longer.
Step 7: Divide the Dough
Once bulk fermentation is complete, lightly flour your work surface.
Gently turn the dough out of the bowl.
Try not to press it aggressively because you want to preserve the air bubbles.
Use a dough scraper to divide the dough into 6 approximately equal pieces.
You can make fewer, larger mini loaves if you prefer.
For very small loaves, divide the dough into 8 pieces.
Step 8: Pre-Shape
Take one piece of dough.
Gently fold the edges toward the center.
Turn it over so the seam is underneath.
Use your hands to gently round the dough.
Repeat with the remaining pieces.
Allow the dough pieces to rest uncovered for about 15–20 minutes.
This resting period allows the gluten to relax and makes final shaping easier.
Step 9: Shape the Mini Loaves
After the bench rest, shape each piece.
For round mini loaves, gently pull the edges toward the center and then turn the dough over.
For small oval loaves, gently stretch the dough into a rectangle and fold it into a compact shape.
Create surface tension by gently pulling the dough toward you across the work surface.
Do not press too hard.
The goal is to keep the dough airy while creating enough tension for it to hold its shape.
Step 10: Prepare the Baking Tray
Line a baking tray with parchment paper.
Place the shaped mini loaves on the tray.
Leave enough space between them so they can expand during proofing and baking.
If you have a small banneton for each loaf, you can proof them individually before transferring them to the tray.
Step 11: Final Proof
Cover the mini loaves with a clean kitchen towel.
You have two options.
For a same-day bake, allow them to proof at room temperature for approximately 1–3 hours.
For more flavor, place them in the refrigerator and allow them to cold-proof for approximately 8–14 hours.
The overnight method is especially convenient.
The cold dough is also easier to score before baking.
Step 12: Preheat the Oven
When you are ready to bake, preheat your oven to approximately 230°C / 450°F.
If using a Dutch oven or baking stone, allow it to preheat thoroughly.
If using a regular baking tray, place a separate oven-safe tray on a lower rack. You can add hot water to this tray when the bread goes into the oven to create steam.
Steam helps the crust develop properly during the first part of baking.
Step 13: Score the Loaves
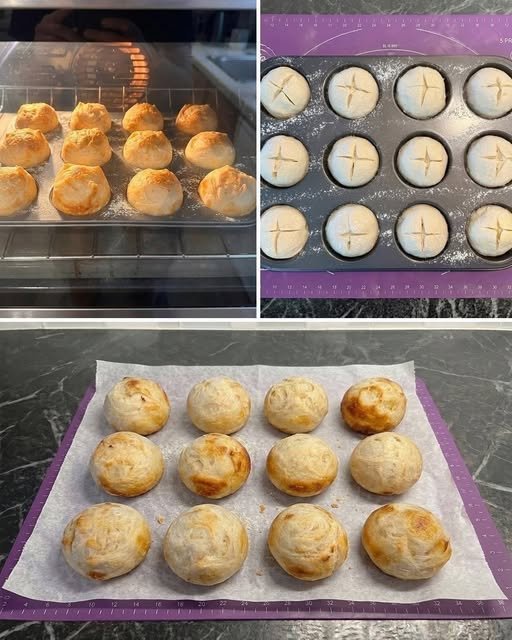
Take the proofed mini loaves and carefully score each one with a sharp knife or bread lame.
A single slash across the top works well.
You can also make simple decorative cuts.
Because the loaves are small, you do not need deep scoring.
A shallow, confident cut is enough to give the expanding dough a controlled opening.
Step 14: Bake the Mini Loaves
Place the tray in the preheated oven.
If using steam, carefully add hot water to the separate tray and quickly close the oven door.
Bake at 230°C / 450°F for approximately 10 minutes.
Then reduce the temperature to 210–220°C / 410–425°F.
Continue baking for another 12–18 minutes, depending on the size of your loaves.
The mini loaves should become golden brown and feel firm on the outside.
Smaller loaves may finish baking sooner, so begin checking them early.
Step 15: Check for Doneness
A properly baked mini sourdough loaf should have:
- A golden-brown crust
- A firm exterior
- A light, airy interior
- A pleasant baked-bread aroma
If you have an instant-read thermometer, the center should generally be around 93–96°C / 200–205°F.
Step 16: Cool the Loaves
Remove the mini loaves from the baking tray.
Place them on a wire cooling rack.
Allow them to cool for at least 45–60 minutes before slicing.
Although the small size means they cool faster than a large loaf, the crumb still needs time to finish setting.
Cutting immediately can result in a gummy or compressed interior.
Why Make Mini Sourdough Loaves?
Mini loaves are incredibly convenient.
Instead of cutting into one large loaf every time you want bread, you can make several small loaves and use them individually.
They are especially useful for:
- Breakfast
- Lunch boxes
- Small sandwiches
- Toast
- Picnics
- Family gatherings
- Homemade bread gifts
- Freezer storage
You can even customize each loaf with different flavors.
Flavor Variations
Garlic Herb Loaftinis
Add dried garlic powder, parsley, oregano, and a little grated cheese to the dough.
Cheese Loaftinis
Fold shredded cheddar, mozzarella, or another favorite cheese into the dough during shaping.
Seeded Loaftinis
Add sunflower seeds, pumpkin seeds, sesame seeds, or flaxseeds.
Cinnamon Raisin Loaftinis
For a sweet version, add raisins and cinnamon along with a little brown sugar.
Rosemary Loaftinis
Add finely chopped fresh rosemary and a small amount of olive oil for a fragrant savory loaf.
Troubleshooting
The Dough Is Very Sticky
Sticky dough is normal with sourdough.
Wet your hands rather than adding excessive flour.
As you perform stretch-and-folds, the dough should become stronger and easier to handle.
The Loaves Do Not Rise
Your starter may not be active enough.
Another possibility is that the dough needs more fermentation time.
Temperature also makes a major difference. A cool kitchen can slow fermentation considerably.
The Loaves Spread Out
This may happen if the dough has fermented too long or if it was not shaped with enough surface tension.
Make sure the dough has enough strength before dividing and shaping.
The Crust Is Too Dark
Reduce the oven temperature slightly or loosely cover the loaves with foil during the final portion of baking.
Sugar and honey can also encourage faster browning.
The Bread Is Gummy
Make sure the loaves are completely baked and allow them to cool before cutting.
Because mini loaves are small, it is tempting to slice them while warm, but giving them time to cool produces a better crumb.
Storage
Once completely cool, store the mini sourdough loaves in a bread bag, paper bag, or airtight container.
They are best enjoyed fresh.
For longer storage, place the cooled loaves in freezer-safe bags or containers.
You can freeze them whole or slice them before freezing.
When you want one, allow it to thaw and gently warm it in the oven or toaster.
Serving Ideas
These little loaves are delicious served with:
- Butter
- Honey
- Jam
- Cream cheese
- Peanut butter
- Eggs
- Cheese
- Avocado
- Chicken salad
- Tuna salad
- Soup
They also make excellent small sandwich breads.
Slice one horizontally and fill it with cheese, vegetables, chicken, or your favorite sandwich ingredients.
Final Tips
The secret to great Sourdough Loaftinis is patience.
Do not rush fermentation.
Use an active starter, measure your ingredients accurately, give the dough enough time to develop, and handle it gently.
Remember that sourdough behaves differently depending on temperature, flour, starter strength, and humidity. Your dough may ferment faster or slower than the times listed in this recipe.
Learn to watch the dough rather than relying entirely on the clock.
When the dough looks puffy, feels airy, and has increased in volume, it is usually ready for the next stage.
Final Result
Sourdough Loaftinis are a fun and practical way to make homemade sourdough bread in a smaller format. Each little loaf develops a beautiful golden crust while staying soft and chewy inside.
They are easier to portion, convenient for sandwiches, wonderful for toast, and perfect for freezing. You can keep them plain or add your favorite ingredients such as herbs, cheese, seeds, garlic, cinnamon, or dried fruit.
Once you master the basic dough, these mini loaves can become one of your favorite sourdough recipes. The process is simple: mix, rest, fold, ferment, divide, shape, proof, score, bake, and cool.
With a little practice and patience, you can make a batch of beautiful homemade Sourdough Loaftinis that look and taste like they came straight from a bakery.