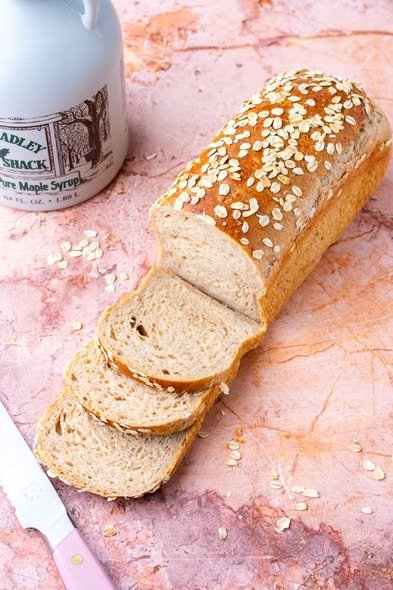

Ingredients
- 100 g active sourdough starter
- 300 g warm milk
- 50 g maple syrup
- 30 g melted butter
- 1 large egg
- 400 g bread flour
- 80 g rolled oats
- 8 g salt
- Extra rolled oats, for topping
- A little butter, for brushing after baking
Equipment
- Large mixing bowl
- Wooden spoon or dough whisk
- 9 x 5-inch loaf pan
- Kitchen towel or plastic wrap
- Dough scraper
- Wire cooling rack
Step 1: Prepare the Sourdough Starter
Use an active and bubbly sourdough starter for this recipe.
Your starter should have been recently fed and should be lively before you begin mixing the dough. A strong starter will help the bread rise properly and develop its characteristic sourdough flavor.
If your starter has been refrigerated, give it enough time after feeding to become active before using it.
Step 2: Soak the Oats
Place the rolled oats in a small bowl.
Pour about 100 g of the warm milk over them and stir.
Let the oats sit for approximately 15–20 minutes.
This softens the oats and prevents them from making the finished bread dry or overly coarse.
Step 3: Mix the Wet Ingredients
In a large mixing bowl, combine:
- Active sourdough starter
- Remaining warm milk
- Maple syrup
- Melted butter
- Egg
Whisk or stir until everything is well combined.
The mixture should look smooth and creamy.
Make sure the melted butter is warm rather than very hot so that it does not negatively affect the starter or cook the egg.
Step 4: Add the Flour
Add the bread flour and soaked oats.
Mix everything together until a rough dough forms.
At this point, there should not be large pockets of dry flour remaining.
The dough may look slightly sticky, but don’t immediately add lots of extra flour.
Cover the bowl and let the dough rest for approximately 30 minutes.
This resting period gives the flour time to absorb the liquid and makes the dough easier to develop.
Step 5: Add the Salt
Sprinkle the salt over the dough.
Using slightly damp hands, gently knead or pinch the dough until the salt is evenly incorporated.
The dough should gradually become smoother.
Step 6: Develop the Dough
Because this is a soft sandwich bread, you can knead it by hand or use a stand mixer.
By Hand
Stretch the dough forward with the heel of your hand, fold it back, rotate the dough, and repeat.
Continue for approximately 8–10 minutes, allowing short rests if the dough becomes difficult to handle.
With a Stand Mixer
Mix on low speed until the ingredients are combined.
Then knead on low to medium-low speed until the dough becomes smoother and more elastic.
The finished dough should feel soft and supple.
It may remain slightly tacky because of the maple syrup, oats, milk, and butter.
Step 7: Bulk Fermentation
Place the dough in a lightly greased bowl.
Cover it and let it ferment at room temperature.
The exact fermentation time will depend on your room temperature and starter strength.
Instead of waiting for an exact doubling, look for the dough to become noticeably puffy, airy, and expanded.
The dough should have increased significantly in volume and may show bubbles around the edges.
This can take several hours.
Step 8: Prepare the Loaf Pan
Lightly butter or grease a 9 x 5-inch loaf pan.
You can also line the pan with parchment paper, leaving a little overhang for easy removal.
Set the prepared pan aside.
Step 9: Shape the Dough
Turn the fermented dough onto a lightly floured surface.
Gently flatten it into a rough rectangle.
Fold the top third toward the center.
Fold the bottom third over the top.
Then roll the dough into a tight cylinder, starting from one short end.
Pinch the seam closed.
Place the dough into the prepared loaf pan with the seam facing down.
Try to make the loaf evenly shaped so that it rises uniformly.
Step 10: Add the Oat Topping
Lightly brush or mist the top of the dough with water or milk.
Sprinkle a small handful of rolled oats over the surface.
Gently press them into the dough so they stay in place during baking.
You can leave the topping plain or add a few extra oat flakes for a rustic appearance.
Step 11: Final Proof
Cover the loaf pan loosely with a kitchen towel or plastic wrap.
Let the dough rise again at room temperature.
The dough should become visibly puffy and rise toward the top of the pan.
The timing can vary considerably depending on temperature and starter activity, so use the appearance of the dough as your main guide.
Avoid letting it become extremely overproofed, because an overproofed loaf may collapse during baking.
Step 12: Preheat the Oven
When the dough is nearly ready, preheat your oven to 190°C / 375°F.
Make sure the oven is fully heated before putting the bread inside.
Because this is a sandwich loaf, you don’t need the heavy steam used for crusty artisan sourdough.
Step 13: Bake
Place the loaf in the center of the preheated oven.
Bake for approximately 35–45 minutes, depending on your oven and loaf size.
The top should become beautifully golden brown.
If the top begins browning too quickly, loosely cover it with aluminum foil during the latter part of baking.
Step 14: Brush With Butter
As soon as the loaf comes out of the oven, brush the top lightly with butter.
This gives the crust a softer texture and adds a subtle buttery finish.
If you prefer a slightly firmer crust, simply leave the loaf unbrushed.
Step 15: Cool Completely
Remove the bread from the pan after a few minutes.
Transfer it to a wire cooling rack.
Allow the loaf to cool completely before slicing.
Cutting sourdough bread while it is still very hot can result in a gummy or compressed crumb.
Once cool, use a serrated bread knife to cut even slices.
Texture and Flavor
This bread has a soft, tender interior with a subtle chew from the sourdough.
The oats provide a mild nutty flavor and pleasant texture, while maple syrup adds gentle sweetness without making the bread taste overwhelmingly sweet.
The combination works especially well for breakfast toast.
How to Serve It
There are countless ways to enjoy this bread.
For a simple breakfast, toast a slice and spread it with butter.
For something sweeter, try:
- Maple syrup and butter
- Peanut butter and banana
- Cream cheese and jam
- Apple slices and nut butter
- Honey and cinnamon
For savory sandwiches, try:
- Turkey and cheese
- Chicken salad
- Egg salad
- Tuna salad
- Grilled cheese
- Ham and cheese
- Roasted vegetables
- Chicken and lettuce
The bread is soft enough for sandwiches but sturdy enough to hold generous fillings.
Helpful Tips
Use Pure Maple Syrup
Pure maple syrup gives the bread the best maple flavor. If you only have maple-flavored pancake syrup, it can work, but the flavor may be different.
Don’t Add Too Much Flour
The dough should feel soft and slightly tacky.
Adding excessive flour can produce a dense loaf.
If the dough is sticky, give it time to develop gluten before deciding whether additional flour is necessary.
Watch the Fermentation
Sourdough fermentation depends heavily on temperature.
A warm kitchen may speed up fermentation, while a cool kitchen may slow it down.
Look for changes in the dough rather than following the clock alone.
Don’t Overproof
The final dough should be puffy and expanded but still have enough strength to rise in the oven.
If it becomes extremely loose and starts collapsing, it may have fermented too far.
Cool Before Slicing
Allowing the bread to cool completely gives the crumb time to set.
This makes slicing much easier and helps produce neat sandwich slices.
Overnight Method
For a more convenient schedule, you can use a longer fermentation.
Prepare the dough and allow it to begin bulk fermentation at room temperature.
Once it has developed and expanded, shape it and place it into the loaf pan.
Cover the pan well and refrigerate it overnight.
The following day, allow the dough to continue proofing at room temperature until it becomes properly puffy.
Then bake as directed.
This method can be especially convenient when you want fresh bread in the morning.
Storage
Once completely cool, store the loaf in an airtight bread bag or container at room temperature.
For the best texture, enjoy it within a few days.
For longer storage, slice the bread and freeze the slices in a freezer-safe bag.
Individual slices can then be thawed or warmed whenever you need them.
Final Thoughts
Homemade Sourdough Maple Oat Sandwich Bread is a wonderful combination of soft sandwich bread and naturally fermented sourdough. The maple syrup adds a delicate sweetness, while the oats give the loaf a hearty but still tender character.
It makes excellent toast, breakfast bread, and everyday sandwiches. With an active starter, a little patience, and careful fermentation, you can create a beautiful homemade loaf with a soft crumb, golden crust, and delicious maple-oat flavor.
Add exact fermentation and proofing cuesInclude dough and bread temperature cues