
:
Ingredients You’ll Need
You only need four ingredients to make these easy gluten-free biscuits.
1. Gluten-Free All-Purpose Flour
Use a good-quality gluten-free all-purpose flour blend designed for baking. If possible, choose one that already contains xanthan gum, which helps provide structure and keeps the biscuits from becoming too crumbly.
Different gluten-free flour blends absorb liquid differently, so the amount of milk you need may vary slightly.
2. Baking Powder
Baking powder gives the biscuits their lift and helps them become light and fluffy. Make sure your baking powder is fresh for the best results.
If you need the recipe to be strictly gluten-free, check the packaging to ensure all ingredients are suitable for your dietary requirements.
3. Butter
Cold butter is the secret to tender, flaky biscuits. Keep the butter chilled until you’re ready to use it, and work quickly when mixing it into the flour.
For a dairy-free version, you can substitute a suitable dairy-free butter alternative.
4. Milk
Milk brings the dough together and gives the biscuits a soft texture. Whole milk provides a richer result, but you can use the milk you normally have available.
Add the milk gradually rather than pouring it all in at once. You want a soft dough, not a wet or sticky one.
How to Make Easy Gluten-Free Biscuits
Step 1: Preheat the Oven
Preheat your oven to 425°F (220°C). A properly heated oven is important because the high initial temperature helps the biscuits rise quickly.
Line a baking sheet with parchment paper or lightly grease it.
Step 2: Combine the Dry Ingredients
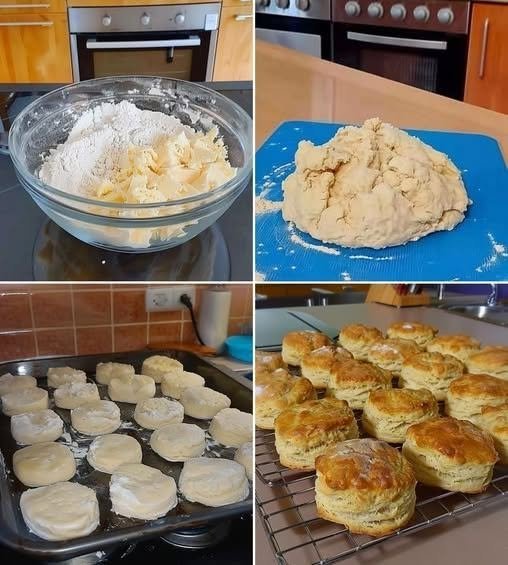
Add the gluten-free flour and baking powder to a large mixing bowl. Whisk them together until evenly combined.
This helps distribute the baking powder throughout the flour so your biscuits rise evenly.
Step 3: Cut in the Cold Butter
Cut the cold butter into small cubes and add it to the flour mixture.
Use a pastry cutter, fork, or your fingertips to work the butter into the flour. Stop when the mixture resembles coarse crumbs, with a few small pieces of butter still visible.
Don’t overwork the butter. Those little pieces will help create a tender texture as the biscuits bake.
Step 4: Add the Milk
Gradually pour the milk into the flour mixture, gently stirring as you go.
You may not need every drop of milk, so add it slowly. Once the dough starts coming together, stop mixing.
The dough should be soft and slightly moist but not overly sticky.
Step 5: Shape the Dough
Transfer the dough to a lightly floured surface or a sheet of parchment paper.
Gently pat or roll the dough to approximately ¾-inch thick. Avoid kneading it like bread dough. Gluten-free biscuit dough doesn’t benefit from extensive handling.
Use a biscuit cutter or round cookie cutter to cut out biscuits. Press the cutter straight down rather than twisting it, which can prevent the biscuits from rising evenly.
Gather any remaining dough, gently press it together, and cut additional biscuits.
Step 6: Bake
Arrange the biscuits on the prepared baking sheet. For softer sides, place them close together. For slightly crispier edges, leave a little space between them.
Bake for approximately 12–15 minutes, or until the tops are lightly golden and the biscuits are cooked through.
Every oven is different, so begin checking them around the 12-minute mark.
Step 7: Serve Warm
Let the biscuits cool for a few minutes before serving. They’re especially delicious while still warm.
For an extra buttery finish, brush the tops with melted butter immediately after they come out of the oven.
Tips for Perfect Gluten-Free Biscuits
Gluten-free baking can sometimes behave differently from traditional baking, but a few simple tricks can make a big difference.
Keep the butter cold. Warm butter can make biscuits spread instead of rising. If your kitchen is warm, chill the shaped biscuits for 10 minutes before baking.
Don’t overmix the dough. Mix only until the ingredients are combined. Overworking the dough can result in dense biscuits.
Measure your flour carefully. Too much flour can make the biscuits dry and crumbly. For the most consistent results, use a kitchen scale if you have one.
Choose a reliable flour blend. Gluten-free flour blends vary considerably. A blend made for general baking usually gives the best results.
Don’t flatten the dough too much. A thicker dough produces taller, softer biscuits.
Easy Variations
Once you’ve mastered the basic four-ingredient recipe, it’s easy to change the flavor.
For cheddar biscuits, fold shredded cheddar cheese into the dough before adding the milk.
For herb biscuits, add a small amount of dried parsley, rosemary, thyme, or Italian seasoning.
For garlic biscuits, mix garlic powder into the dry ingredients and brush the baked biscuits with melted butter.
For a slightly sweeter version, add a spoonful of sugar and serve the biscuits with jam or honey.
What to Serve With Gluten-Free Biscuits
These biscuits are incredibly versatile. Serve them alongside scrambled eggs and fresh fruit for breakfast, or use them as a side dish for lunch or dinner.
They pair beautifully with:
- Creamy soups
- Chicken or vegetable stew
- Scrambled or fried eggs
- Sausage and gravy
- Roasted chicken
- Mashed potatoes and vegetables
- Honey or fruit jam
- Butter and cheese
You can even split them in half and use them to make small breakfast sandwiches.
How to Store Leftovers
Store completely cooled biscuits in an airtight container at room temperature for up to 2 days. For longer storage, refrigerate them for several days.
You can also freeze baked biscuits. Place them in a freezer-safe container or bag and freeze for up to a few months. Reheat them in a warm oven or toaster oven for the best texture.
If you want to prepare them ahead of time, you can also freeze unbaked biscuit rounds. Bake them directly from frozen, adding a few extra minutes to the baking time.
Frequently Asked Questions
Can I make these biscuits dairy-free?
Yes. Replace the butter with a dairy-free butter alternative and use your preferred dairy-free milk. Choose products that are certified gluten-free if you need to avoid even trace amounts of gluten.
Why are my gluten-free biscuits crumbly?
Gluten-free biscuits naturally have a different structure from wheat-based biscuits. Too much flour or not enough liquid can make them particularly crumbly. Measuring the flour accurately and using a suitable gluten-free flour blend can help.
Can I make the dough ahead of time?
Yes. Shape the biscuits and refrigerate them for several hours before baking. You can also freeze the unbaked biscuits for convenient baking later.
Final Thoughts
These easy gluten-free biscuits prove that homemade baking doesn’t have to be complicated. With just four basic ingredients, you can make warm, tender biscuits that are perfect for almost any meal.
Keep some gluten-free flour, baking powder, butter, and milk on hand, and you’ll always be just a few simple steps away from a fresh batch. Serve them warm with butter, pair them with a hearty soup, or turn them into breakfast sandwiches—the possibilities are endless.
Once you try this recipe, you may find yourself making these simple gluten-free biscuits whenever you need a quick homemade side dish.
If you’d like, I can also turn this into a Pinterest/food-blog version with an SEO meta description, recipe card, nutrition section, FAQs, and keyword-rich headings.