
Ingredients
For the sourdough loaf:
- 1 cup (240 g) active gluten-free sourdough starter
- 1½ cups (360 g) warm water
- 2 cups (240 g) brown rice flour
- 1 cup (120 g) sorghum flour
- ½ cup (60 g) tapioca starch
- ½ cup (60 g) potato starch
- 2 tablespoons ground psyllium husk
- 1½ teaspoons fine sea salt
- 1 tablespoon maple syrup or honey
- 2 tablespoons olive oil
- 1 teaspoon apple cider vinegar
- 1 tablespoon sesame seeds or sunflower seeds, optional
For the pan:
- A little olive oil
- Rice flour or parchment paper
Before You Begin
For a truly gluten-free loaf, make sure that your sourdough starter and every flour and ingredient you use are certified gluten-free if cross-contamination is a concern. Gluten-free sourdough starter can be made by feeding a mixture of gluten-free flour and water over several days until it becomes bubbly and reliably doubles in volume after feeding.
Your starter should be active when you begin the recipe. It should look bubbly, smell pleasantly sour, and show plenty of fermentation activity.
Because gluten-free dough does not develop the elastic gluten network found in wheat bread, you do not need to knead it. Psyllium husk provides structure and helps hold moisture, making it particularly useful in gluten-free sourdough baking.
Step 1: Prepare the Psyllium Mixture
Place the warm water in a large mixing bowl. Add the ground psyllium husk and whisk thoroughly.
Let the mixture stand for about 5 to 10 minutes. It will gradually become thick and gel-like.
This step is important because psyllium absorbs water and creates a flexible gel that helps bind the gluten-free flours together. If you skip this step, the finished bread may be more crumbly.
Step 2: Mix the Dough
Add the active gluten-free sourdough starter to the psyllium mixture. Stir in the maple syrup or honey, olive oil, and apple cider vinegar.
In a separate bowl, combine the brown rice flour, sorghum flour, tapioca starch, potato starch, and salt.
Gradually add the dry ingredients to the wet ingredients. Use a sturdy wooden spoon or spatula to mix everything thoroughly.
There is no need to knead the dough. Simply mix until all the flour has been incorporated and there are no dry patches.
The dough should be thick, sticky, and somewhat like a very stiff batter. Do not add large amounts of extra flour just because it looks wet. Gluten-free dough generally requires more hydration than conventional bread dough.
If the mixture appears extremely dry, add water one tablespoon at a time until you have a thick but workable consistency.
Step 3: Shape and Ferment
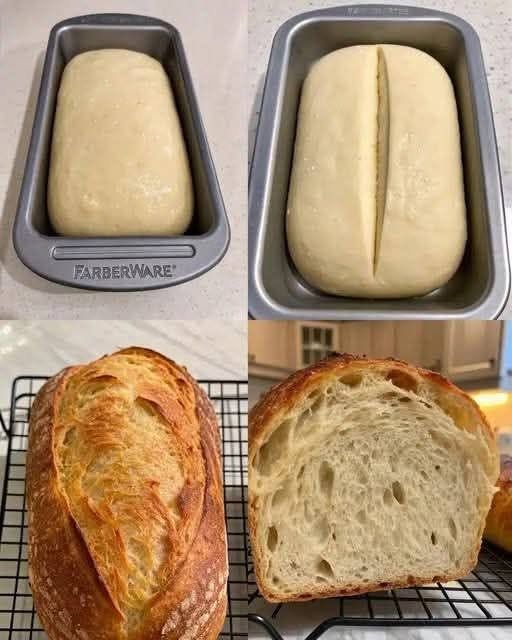
Lightly grease a 9 × 5-inch loaf pan with olive oil and, if desired, line it with parchment paper.
Transfer the dough into the prepared pan. Smooth the surface with a wet spatula or damp hands. You can sprinkle sesame seeds or sunflower seeds over the top.
Cover the pan loosely with a clean kitchen towel or plastic wrap.
Leave the dough at room temperature to ferment for approximately 4 to 8 hours. The exact time depends on the strength of your starter, room temperature, and hydration.
Instead of waiting for the dough to double dramatically, look for a noticeable increase in volume and small bubbles or cracks on the surface. Gluten-free sourdough can sometimes rise less dramatically than wheat sourdough.
Avoid letting it ferment for too long. An over-fermented gluten-free loaf can collapse during baking and develop a dense or gummy texture.
Step 4: Preheat the Oven
When the dough has nearly finished fermenting, preheat your oven to 425°F (220°C).
Allow the oven to heat thoroughly before baking. A properly preheated oven helps the bread rise quickly during the first stage of baking and encourages a crisp crust.
For an especially crisp crust, place a sturdy baking tray on the bottom rack while the oven heats.
Step 5: Bake the Bread
Place the loaf pan in the oven and bake for 20 minutes at 425°F (220°C).
Then reduce the temperature to 400°F (200°C) and continue baking for another 35 to 45 minutes.
The loaf should develop a deep golden-brown crust and feel firm when gently tapped. If the top begins browning too quickly, loosely cover it with aluminum foil for the final part of baking.
For the most reliable result, the center of the loaf should reach approximately 205–210°F (96–99°C).
Once baked, remove the pan from the oven and allow the bread to cool in the pan for about 10 minutes.
Step 6: Cool Completely
Carefully remove the loaf from the pan and place it on a wire rack.
This is one of the most important steps in gluten-free bread baking: do not slice the loaf while it is still hot.
Gluten-free sourdough needs time for its internal structure to set. Cutting it too early can make the center appear gummy or cause the slices to fall apart.
Let the bread cool completely—ideally for 2 to 3 hours—before slicing.
Once cooled, use a sharp serrated bread knife and cut gentle, even slices.
Serving Suggestions
This sourdough is delicious toasted and served with butter, jam, nut butter, or avocado. Its slightly tangy flavor also pairs beautifully with eggs, soups, stews, and roasted vegetables.
For a savory loaf, add herbs such as rosemary, thyme, or oregano to the dough. You can also add seeds such as pumpkin, sunflower, or flaxseed.
For a slightly sweeter breakfast bread, increase the maple syrup to two tablespoons and add a teaspoon of cinnamon.
Storage
Store the cooled bread in an airtight container or bread bag at room temperature for up to 2 days. Because gluten-free sourdough contains considerable moisture, refrigeration can sometimes make it firm more quickly.
For longer storage, slice the loaf and freeze the slices in a sealed freezer bag. Individual slices can be toasted directly from frozen.
Troubleshooting
Bread is gummy in the center: It may have been underbaked, sliced while warm, or fermented too long. Bake it until the center reaches the recommended temperature and allow it to cool completely.
Bread is very dense: Your sourdough starter may not have been active enough, or the dough may have needed more fermentation time.
Bread collapsed: The dough may have over-fermented. Try shortening the fermentation period next time.
Bread is dry or crumbly: Too much flour or insufficient hydration can cause this. Measure ingredients by weight when possible and avoid adding extra flour simply because the dough feels sticky.
Final Tips
The biggest secret to successful gluten-free sourdough is patience and hydration. The dough should be sticky, and that is perfectly normal. Resist the temptation to knead it or add excessive flour.
An active starter, accurate measurements, adequate fermentation, and complete cooling will give you the best results. Once you become familiar with how your particular starter behaves, you can adjust the fermentation time to suit your kitchen’s temperature.
The finished loaf should have a crisp, deeply colored crust, a moist but fully set interior, and the characteristic mild tang of sourdough—all without kneading or gluten.