
For the Dough
- 500 g bread flour
- 350 g water, preferably cool or room temperature
- 100 g active sourdough starter, 100% hydration
- 10 g fine sea salt
- 10 g additional water, if needed
This recipe makes 3 medium baguettes, approximately 250–280 g each.
Before You Begin
Make sure your sourdough starter is active and bubbly before beginning. A starter that has recently doubled in size after feeding and smells pleasantly tangy or slightly fruity is ideal.
Because sourdough fermentation depends heavily on temperature, the times below are approximate. In a warm kitchen, the dough may ferment faster; in a cool kitchen, it may take considerably longer.
Step 1: Mix the Dough
Place the bread flour and 350 g water in a large mixing bowl. Stir until all the flour is moistened and no dry patches remain. Cover the bowl and let the mixture rest for 30–45 minutes.
This resting period, known as autolyse, gives the flour time to absorb the water and helps develop gluten naturally.
Add the active sourdough starter and mix it thoroughly into the dough. Once the starter is incorporated, sprinkle in the salt.
If the dough feels very stiff, add the remaining 10 g water gradually. Mix by pinching and folding the dough with wet hands until the ingredients are evenly distributed.
The dough will be sticky and somewhat loose at this stage. Resist the temptation to add lots of extra flour.
Step 2: Develop the Gluten
Cover the bowl and let the dough rest for about 30 minutes.
Now perform a series of stretch-and-folds. With slightly wet hands, grab one side of the dough, gently stretch it upward, and fold it over the center. Rotate the bowl and repeat on all four sides.
Complete one set every 30 minutes for the first 2 hours, giving you about four sets in total.
As you work, the dough should become smoother, stronger, and more elastic. By the final fold, it should hold its shape better and feel less sticky.
Step 3: Bulk Fermentation
After the final fold, cover the dough and leave it at room temperature to continue fermenting.
Depending on your kitchen temperature and starter strength, bulk fermentation may take approximately 3–5 hours from the time the starter was added.
Don’t rely solely on the clock. Look for signs that the dough is ready:
- It should increase in volume by roughly 50–75%.
- The surface should look slightly domed.
- Small bubbles should be visible around the sides and underneath.
- The dough should jiggle gently when the bowl is moved.
- It should feel airy rather than dense.
Avoid waiting for the dough to completely double, as this can result in over-fermentation.
Step 4: Divide and Pre-Shape
Lightly flour your work surface and gently turn the dough out onto it.
Using a bench scraper, divide the dough into three roughly equal pieces. Try not to tear or aggressively press the dough, because you want to retain as much fermentation gas as possible.
Gently pre-shape each piece into a loose cylinder or small log. Place the pieces seam-side down and cover them with a lightly floured towel.
Let them rest for 20–30 minutes.
This resting period allows the gluten to relax, making the final shaping much easier.
Step 5: Shape the Baguettes
Take one piece of dough and gently flatten it into a rough rectangle.
Fold the upper third toward the center and press the seam lightly. Fold the lower third upward and press again. Then fold the dough in half lengthwise, using the heel of your hand to seal the seam.
Roll the dough gently from the center outward until it reaches approximately 35–40 cm long, tapering the ends slightly.
Repeat with the remaining pieces.
Place the shaped baguettes seam-side up in a well-floured couche, clean kitchen towel, or baguette proofing cloth. Create folds between the baguettes so they support one another.
Step 6: Final Proof
Cover the baguettes and let them proof at room temperature for approximately 45–90 minutes.
You can also use an overnight cold proof for more developed flavor. Place the shaped baguettes in the refrigerator for 8–14 hours, covered well to prevent them from drying out.
The baguettes don’t necessarily need to double in size during the final proof. They should become noticeably lighter and puffier.
Step 7: Preheat the Oven
About 45–60 minutes before baking, place a baking stone, baking steel, or heavy baking tray in the oven.
Preheat to 240°C (465°F).
For a crisp crust and excellent oven spring, you need plenty of steam during the first part of baking. If your oven doesn’t have a steam function, place a sturdy empty metal pan on a lower rack while the oven heats.
Step 8: Score the Baguettes
Carefully transfer the proofed baguettes to parchment paper or a lightly floured baking surface.
Using a very sharp bread lame or razor blade, make 3–5 diagonal cuts along the length of each baguette. Hold the blade at a shallow angle and make confident, swift cuts.
The cuts should overlap slightly and run at an angle rather than straight across the loaf.
Scoring controls where the bread expands in the oven and gives baguettes their classic appearance.
Step 9: Bake
Transfer the baguettes to the preheated baking stone, steel, or tray.
Immediately introduce steam. If using a separate metal pan, carefully pour a cup of hot water into it and quickly close the oven door.
Bake with steam for approximately 12–15 minutes.
Then carefully remove the steam pan, if possible, and reduce the oven temperature to 220°C (430°F).
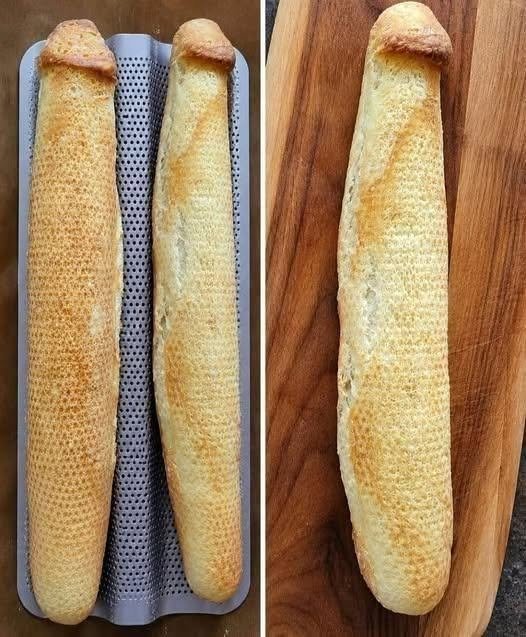
Continue baking for another 10–15 minutes, or until the baguettes are deeply golden brown and sound hollow when tapped.
For an especially crisp crust, turn off the oven, crack the door open slightly, and leave the baguettes inside for another 5 minutes.
Step 10: Cool Completely
Transfer the baguettes to a wire rack and let them cool for at least 30–45 minutes before slicing.
It may be tempting to cut into them immediately, but the interior is still setting as the bread cools. Cutting too early can make the crumb gummy.
Once cooled, slice and serve with butter, cheese, soup, roasted vegetables, or your favorite sandwich fillings.
Tips for Perfect Sourdough Baguettes
Use an active starter: A weak starter will produce dense baguettes with poor oven spring.
Don’t add too much flour: Sticky dough is normal. Excess flour can make the baguettes heavy and dry.
Watch the dough, not the clock: Fermentation speed changes with temperature, flour, starter activity, and hydration.
Handle gently: The bubbles created during fermentation are valuable. Avoid aggressively punching down the dough.
Bake until deeply golden: Pale baguettes often have a softer crust and less developed flavor. Don’t be afraid of a rich brown color.
Create plenty of steam: Steam keeps the crust flexible during the first few minutes of baking, allowing the baguettes to expand dramatically before the crust sets.
Storage
Fresh baguettes are best eaten on the day they are baked. Store leftovers in a paper bag or wrapped loosely in a clean towel for up to a day.
For longer storage, slice the baguettes and freeze them in an airtight freezer bag. Reheat directly from frozen in a 180°C (350°F) oven for several minutes to restore some of the crispness.
The result should be baguettes with a beautifully crackly crust, an airy and chewy crumb, and a subtle sourdough tang—a homemade version that’s wonderfully close to the classic French bakery loaf.