
Ingredients
For the Dough
- 100 g active sourdough starter
- 350 g all-purpose flour or bread flour
- 200 g warm water
- 1 tablespoon olive oil
- 8 g salt
- 1 teaspoon honey or sugar, optional
These quantities make approximately 6–8 pita breads, depending on how large you make them.
Choosing the Right Sourdough Starter
For the best results, use a sourdough starter that is active and recently fed.
A healthy active starter should show plenty of bubbles and have risen noticeably after feeding. It should smell pleasantly fermented rather than strongly unpleasant.
An active starter gives the dough better fermentation power and helps produce lighter pita.
If your starter has been sitting unused in the refrigerator, give it one or more regular feedings before beginning this recipe so it becomes active again.
Preparing the Overnight Dough
Begin by adding the active sourdough starter and warm water to a large mixing bowl.
Stir until the starter is mostly dispersed in the water.
Add the flour and mix with a wooden spoon, spatula, or your hands until no large dry patches remain.
The dough may look rough and slightly sticky at this stage. That’s completely normal.
Cover the bowl and let the mixture rest for approximately 20–30 minutes.
This short resting period allows the flour to absorb the water and makes the dough easier to work with.
Add the Salt and Olive Oil
After the initial rest, add the salt and olive oil.
If you’re using honey or sugar, add it at this stage as well.
Work the ingredients into the dough using your hands. Pinch, fold, and gently knead the dough until everything is evenly incorporated.
The dough should gradually become smoother and more elastic.
You don’t need to knead it aggressively.
Stretch and Fold
Instead of traditional long kneading, sourdough dough benefits from gentle stretch-and-fold movements.
With slightly damp hands, grab one side of the dough, stretch it upward, and fold it over the center.
Turn the bowl and repeat the process from another side.
Continue until you’ve completed several folds.
Cover the bowl and allow the dough to rest for about 30 minutes.
Repeat the stretch-and-fold process two or three more times.
As the dough rests, you should notice it becoming smoother, stronger, and more elastic.
Overnight Fermentation
After the final stretch and fold, cover the bowl tightly.
Leave the dough at room temperature overnight.
The exact fermentation time depends heavily on the temperature of your kitchen and the strength of your starter.
In a warm kitchen, fermentation may happen faster. In a cooler environment, the dough may need more time.
Rather than relying only on the clock, look at the dough.
By morning, it should appear noticeably expanded and airy, with some bubbles visible around the edges.
You don’t necessarily need the dough to double completely.
Refrigerating the Dough
If your kitchen is warm or you prefer a slower fermentation, you can place the covered dough in the refrigerator after it has begun fermenting.
Cold fermentation can help develop flavor and makes the dough easier to handle.
If refrigerated overnight, allow the dough to sit at room temperature for a little while before shaping so it becomes easier to roll.
Divide the Dough
The next day, lightly flour your work surface.
Turn the fermented dough onto the surface.
Divide it into 6–8 approximately equal pieces.
For larger pita, make 6 portions.
For smaller pita, make 8 portions.
Try to keep the pieces similar in size so they cook at approximately the same rate.
Shape the Dough Balls
Take one piece of dough and gently pull the edges toward the center.
Turn it over so the smooth side faces upward.
Cup your hand around the dough and gently roll it against the work surface to create a smooth ball.
Repeat with the remaining pieces.
Place the dough balls on a lightly floured tray or work surface.
Cover them with a clean kitchen towel or plastic wrap.
Let them rest for approximately 20–30 minutes.
This resting period relaxes the gluten and makes rolling much easier.
Rolling the Pita
Take one dough ball and place it on a lightly floured surface.
Gently flatten it with your fingertips.
Use a rolling pin to roll the dough into a round approximately 5–7 inches in diameter.
Try to maintain an even thickness throughout the pita.
This is important because very thick areas may not puff properly.
At the same time, avoid rolling the dough extremely thin.
The goal is a relatively even disk that can trap steam during cooking.
Important Tip for Getting the Pocket
One of the most important secrets to puffed pita is keeping the dough relatively even.
Avoid pressing one side much thinner than the other.
Also avoid creating holes in the dough.
The trapped moisture inside the dough turns into steam during cooking. That steam helps separate the layers and create the pocket.
Cooking on a Skillet
A hot skillet or cast-iron pan is one of the easiest ways to cook sourdough pita.
Place a dry skillet over medium-high to high heat.
Allow it to become thoroughly hot before adding the dough.
Place one rolled pita onto the dry skillet.
Cook for approximately 30–60 seconds.
You should begin seeing bubbles appear on the surface.
Flip the pita.
Cook the other side for another 30–60 seconds.
Flip again if necessary.
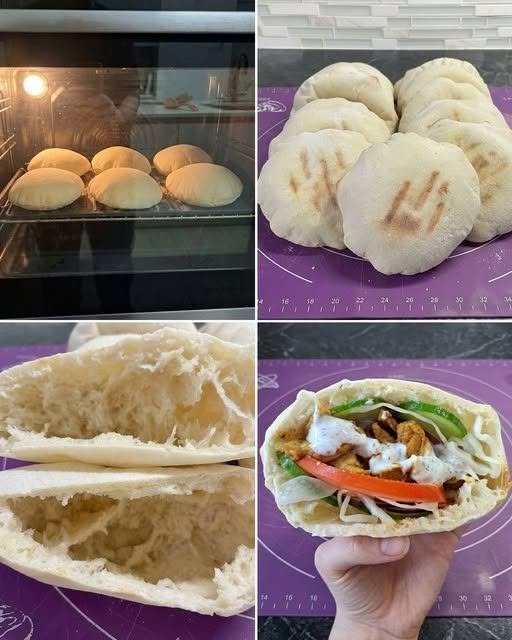
As the pita continues cooking, it may puff dramatically.
Once golden spots appear and the bread is cooked through, remove it from the pan.
Repeat with the remaining dough.
Cooking Pita in the Oven
You can also bake the pita in a very hot oven.
Preheat the oven to approximately 475°F–500°F (245°C–260°C).
Place a baking stone, steel, or heavy baking tray inside while the oven preheats.
The cooking surface needs to be extremely hot.
Place a rolled pita onto the hot surface.
Bake for approximately 2–4 minutes.
The pita should puff as steam develops inside.
Remove it as soon as it is cooked and lightly browned.
Avoid overbaking because this can make the pita dry and brittle.
Why Didn’t My Pita Puff?
Don’t worry if your first few pitas don’t puff perfectly.
Pita puffing depends on several factors.
The cooking surface needs to be hot enough.
The dough needs to have fermented properly.
The pita should be rolled evenly.
Most importantly, the surface of the dough should remain intact.
If the dough has cracks or holes, steam can escape instead of inflating the pita.
Another possible reason is that the dough was rolled too thick or too thin.
It can take a few attempts to find the exact thickness and cooking temperature that work best in your kitchen.
Keeping the Pita Soft
Fresh pita can become dry if exposed to air for too long.
As soon as each pita comes off the heat, place it inside a clean kitchen towel.
You can stack the warm pitas together and cover them.
The trapped steam helps keep them soft.
Once they have cooled, transfer them to an airtight container or food-safe bag.
Serving Ideas
Homemade sourdough pita is incredibly versatile.
Serve it with:
- Hummus
- Baba ganoush
- Tzatziki
- Labneh
- Falafel
- Grilled chicken
- Roasted vegetables
- Fresh salad
- Scrambled eggs
- Grilled meat
- Cheese
- Olive oil and herbs
You can also cut the pita into triangles and toast them until crisp to make homemade pita chips.
How to Store Sourdough Pita
Allow the pita to cool completely before storing.
Place the cooled bread in an airtight bag or container.
At room temperature, homemade pita is best enjoyed within a couple of days.
For longer storage, freeze the pita.
Separate individual pieces with parchment paper if desired and place them in a freezer-safe bag.
When you’re ready to eat them, warm them directly in a skillet, oven, or air fryer.
Reheating Instructions
To reheat pita in a skillet, place it over medium heat for approximately 20–30 seconds per side.
You can also wrap the pita in foil and warm it in the oven.
For a quick method, place it in the air fryer for a short time at moderate heat.
Avoid overheating because pita can become dry quickly.
Recipe Tips
Use an Active Starter
An active starter is essential for reliable fermentation.
Don’t Add Too Much Flour
A slightly soft dough generally produces better pita than a very stiff dough.
Give the Dough Time to Relax
Resting after dividing the dough makes rolling much easier.
Preheat Thoroughly
Whether using a skillet or oven, high heat is one of the most important factors for getting pita to puff.
Roll Evenly
Try to create a consistent thickness from the center toward the edges.
Don’t Overcook
Remove the pita once it has puffed and developed light golden spots.
Frequently Asked Questions
Can I use whole wheat flour?
Yes. You can replace some of the white flour with whole wheat flour. However, using a large amount of whole wheat flour can make the pita denser, so you may need to adjust the water slightly.
Can I make the dough during the day?
Yes. You don’t have to ferment it specifically overnight. The important thing is allowing the sourdough enough time to ferment properly.
Can I refrigerate the dough?
Yes. Refrigeration can slow fermentation and allow you to work with the dough on a schedule that suits you.
Can I freeze homemade pita?
Absolutely. Once completely cooled, pita freezes very well in an airtight freezer-safe bag.
Why is my pita hard?
Overcooking is one common reason. Another is allowing the cooked pita to cool uncovered. Keep freshly cooked pita wrapped in a clean towel to help retain moisture.
Can I make mini pita?
Yes. Divide the dough into smaller portions and roll them into smaller rounds. Keep in mind that smaller pita may cook faster.
Final Thoughts
Homemade Overnight Sourdough Pita Bread is a rewarding recipe that turns a few simple ingredients into soft, flavorful homemade bread. The overnight fermentation makes the process convenient while allowing the sourdough to develop its characteristic flavor.
The key to successful pita is patience, proper fermentation, even rolling, and high cooking heat. Once you get those elements right, you may be surprised by how beautifully the dough puffs.
Serve the warm pita with hummus, falafel, grilled vegetables, chicken, dips, or your favorite fillings. You can also freeze extra pita so you always have homemade bread ready for a quick meal.
With a little practice, this overnight sourdough pita recipe can become a regular part of your homemade bread routine.