
Ingredients
For the Coconut Filling
- 2 cups unsweetened shredded coconut
- 1 cup sweetened condensed milk
- 1 teaspoon vanilla extract
- Pinch of salt
For the Chocolate Coating
- 250 g milk or dark chocolate
- 1 teaspoon coconut oil, optional
Step 1: Prepare the Coconut Mixture
Place the shredded coconut in a large mixing bowl.
Pour in the sweetened condensed milk.
Add vanilla extract and a small pinch of salt.
Using a spoon or spatula, mix everything together until the coconut is evenly coated.
The mixture should be sticky and moist enough to hold together when pressed.
If it seems extremely wet, add a little more shredded coconut.
If it seems too dry, add a small amount of condensed milk.
Step 2: Shape the Bars
Line a small baking tray or flat container with parchment paper.
Transfer the coconut mixture onto the tray.
Press it down firmly with the back of a spoon or clean hands.
Create an even layer about 1–2 cm thick.
Alternatively, you can form individual small bars by taking portions of the coconut mixture and pressing them into compact rectangular shapes.
Try to make the bars similar in size so they chill and coat evenly.
Step 3: Chill the Coconut Bars
Place the shaped coconut mixture in the refrigerator for approximately 1–2 hours.
The chilling time allows the condensed milk and coconut to firm up.
For a faster option, place the tray in the freezer for about 30–45 minutes.
The bars should be firm enough to handle without falling apart.
Step 4: Cut the Bars
If you pressed the coconut mixture into one large slab, remove it from the refrigerator.
Use a sharp knife to cut it into small rectangular bars.
Wipe the knife between cuts if necessary to create cleaner edges.
If you shaped individual bars before chilling, simply continue to the chocolate-coating step.
Step 5: Melt the Chocolate
Break the chocolate into small pieces and place it in a heatproof bowl.
Melt it gently using a double boiler or microwave.
If using a microwave, heat in short intervals and stir between each interval.
Continue until the chocolate is smooth.
Be careful not to overheat the chocolate.
For a slightly thinner coating, stir in 1 teaspoon of coconut oil.
Step 6: Coat the Coconut Bars
Use a fork to carefully pick up one chilled coconut bar.
Dip it into the melted chocolate.
Turn it gently so the entire surface is covered.
Lift the bar out and allow excess chocolate to drip back into the bowl.
Place the coated bar onto a parchment-lined tray.
Repeat with the remaining coconut bars.
Step 7: Create a Chocolate Drizzle
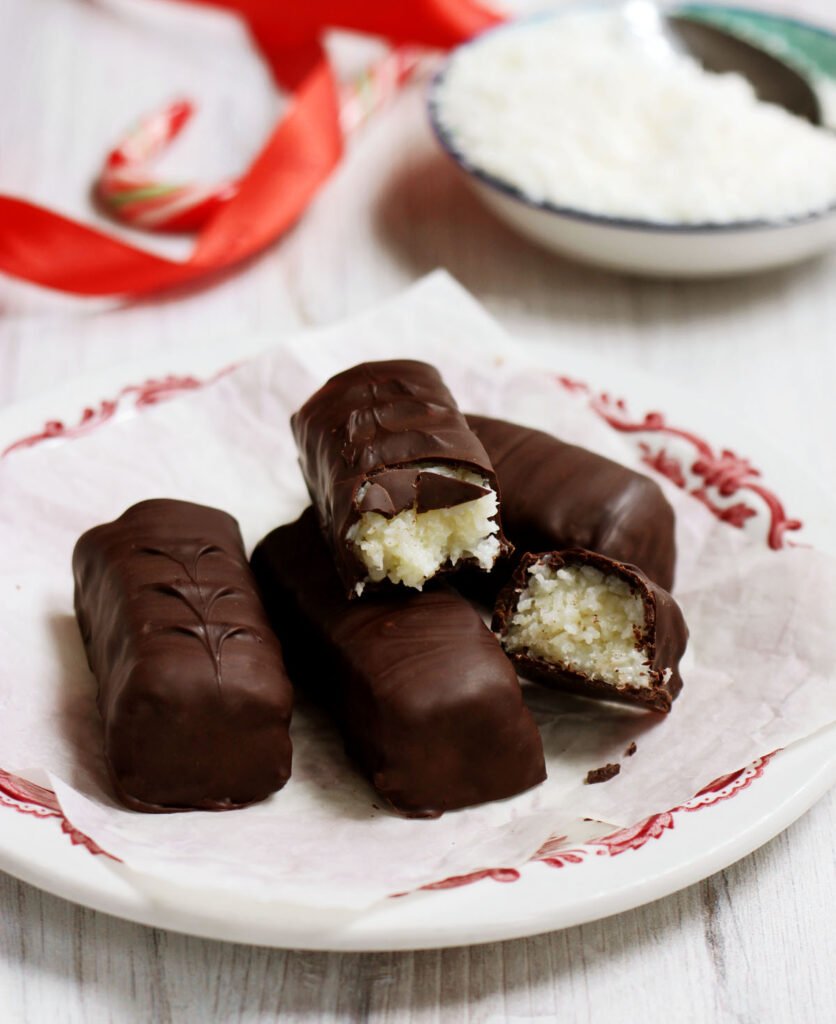
For an attractive finish, drizzle a little extra melted chocolate over the tops of the bars.
You can use a spoon or a small piping bag.
This creates a simple bakery-style appearance.
Step 8: Chill Again
Place the chocolate-coated bars in the refrigerator.
Chill for approximately 20–30 minutes, or until the chocolate has completely set.
Once firm, the Bounty Bars are ready to enjoy.
Tips for Perfect Homemade Bounty Bars
Use Fine Shredded Coconut
Fine shredded coconut creates a smoother filling that is easier to shape.
Very large coconut flakes may make the bars more difficult to compact.
Press the Filling Firmly
When shaping the coconut mixture, press it firmly.
This helps prevent the bars from breaking when they are dipped in chocolate.
Chill Before Dipping
Cold coconut bars are much easier to coat.
If the filling feels soft or fragile, return it to the refrigerator before dipping.
Don’t Overheat the Chocolate
Chocolate can become thick or grainy if it gets too hot.
Melt it gently and stir frequently.
Work Quickly
Once the chocolate is ready, coat the chilled coconut bars without leaving them at room temperature for too long.
Milk Chocolate Bounty Bars
Milk chocolate creates a sweet and creamy coating.
This is a great choice if you prefer a sweeter coconut candy.
Use good-quality milk chocolate for the smoothest result.
Dark Chocolate Bounty Bars
Dark chocolate gives the bars a richer flavor and balances the sweetness of the condensed milk.
Semi-sweet chocolate is another excellent option.
The slight bitterness of dark chocolate pairs beautifully with sweet coconut.
White Chocolate Coconut Bars
For a different version, coat the coconut filling with melted white chocolate.
You can add a little toasted coconut on top before the chocolate sets.
The result is extra creamy and coconut-forward.
Toasted Coconut Version
For additional flavor, lightly toast some of the shredded coconut before making the filling.
Spread the coconut on a dry baking sheet and toast gently until lightly golden.
Allow it to cool completely before mixing it with the condensed milk.
Toasted coconut gives the bars a deeper, nuttier flavor.
Almond Coconut Bars
For a variation, place a whole blanched almond or roasted almond in the center of each coconut bar before coating it with chocolate.
Press the almond gently into the coconut mixture so it stays in place.
This creates a delicious almond-and-coconut combination.
How to Make Them Less Sweet
Because sweetened condensed milk provides most of the sweetness, using unsweetened shredded coconut is helpful if you prefer a less sugary coconut center.
Dark chocolate can also provide a more balanced coating.
Avoid adding additional sugar to the filling because it is already sweet enough.
How to Store Bounty Bars
Store the finished bars in an airtight container in the refrigerator.
They are best enjoyed chilled or after sitting at room temperature briefly.
Keep parchment paper between layers if you are stacking them.
Properly stored, they can stay fresh for several days.
For longer storage, freeze the finished bars in a freezer-safe container.
Allow them to thaw in the refrigerator before serving.
Frequently Asked Questions
Can I make Bounty Bars without an oven?
Yes. This is a completely no-bake recipe.
The coconut filling is mixed, shaped, chilled, and coated with melted chocolate.
Can I use sweetened coconut?
You can, but the finished bars will be considerably sweeter.
Unsweetened shredded coconut gives you better control over the sweetness.
Why is my coconut mixture falling apart?
The mixture may need more moisture or more compression.
Add a small amount of condensed milk if necessary and press the mixture firmly when shaping.
Chilling also helps the bars hold together.
Why is my chocolate too thick?
The chocolate may have cooled or may not have enough fluidity.
You can gently warm it again and, if desired, add a small amount of coconut oil.
Can I freeze homemade Bounty Bars?
Yes.
Place them in a freezer-safe airtight container with parchment between layers.
Thaw them in the refrigerator before serving.
Recipe Card
Homemade Bounty Bars
Prep Time: 20 minutes
Chilling Time: 1½–2½ hours
Total Time: About 2 hours 20 minutes
Yield: Approximately 12–16 bars
Ingredients
Coconut Filling
- 2 cups unsweetened shredded coconut
- 1 cup sweetened condensed milk
- 1 teaspoon vanilla
- Pinch of salt
Chocolate Coating
- 250 g milk or dark chocolate
- 1 teaspoon coconut oil, optional
Instructions
- Combine coconut, condensed milk, vanilla, and salt.
- Mix until the coconut is evenly coated.
- Press the mixture firmly into a lined tray or shape into individual bars.
- Refrigerate for 1–2 hours.
- Cut into rectangular bars if using a slab.
- Melt the chocolate gently.
- Add coconut oil if desired.
- Dip each chilled coconut bar into the chocolate.
- Allow excess chocolate to drip away.
- Place on parchment paper.
- Drizzle with additional chocolate if desired.
- Refrigerate for 20–30 minutes.
- Serve once the chocolate has set.
Final Thoughts
Homemade Bounty Bars are an easy and delicious way to enjoy the classic combination of coconut and chocolate at home. The recipe requires no baking and only a few basic ingredients.
The creamy coconut center is sweet, chewy, and full of coconut flavor, while the chocolate coating adds a rich outer layer. You can use milk chocolate for a sweeter treat or dark chocolate for a deeper contrast.
Once you master the basic recipe, try toasted coconut, almonds, dark chocolate, or white chocolate to create your own variations.
These little bars are perfect for keeping in the refrigerator whenever you want a homemade coconut-and-chocolate treat.