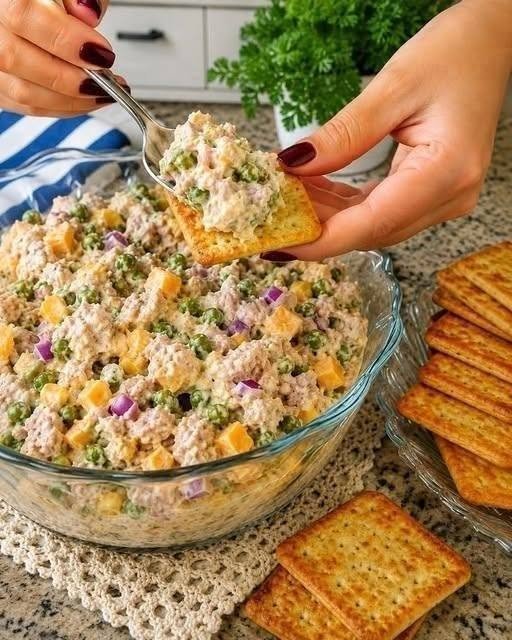

Ingredients
Tuna
- 2 cans tuna, drained
- Choose tuna packed in water or your preferred variety.
- Make sure the tuna is thoroughly drained before mixing.
Creamy Dressing
- ½ cup Greek yogurt
- 2 tablespoons light mayonnaise
- 1 tablespoon fresh lemon juice
- 1 teaspoon Dijon mustard
- ¼ teaspoon garlic powder
- Salt, to taste
- Black pepper, to taste
Fresh Vegetables
- ¼ cup finely chopped celery
- 2 tablespoons finely chopped red onion
- 1 tablespoon chopped fresh parsley
- 1 tablespoon chopped pickles, optional
Optional
- 1–2 tablespoons water or milk if the mixture is too thick
- Extra lemon juice for a brighter flavor
- Fresh dill for additional freshness
- Paprika for a little extra flavor
Step 1: Gather and Prepare Your Ingredients
Before beginning, place all of your ingredients on the counter. Preparing everything first makes the recipe much easier.
Open the tuna cans and drain them completely. Wash the celery and parsley if needed. Peel the red onion and finely chop it.
It is best to chop the vegetables fairly small. Small pieces distribute more evenly throughout the tuna mixture and make every bite balanced.
If you are using pickles, chop them finely as well.
Step 2: Drain the Tuna Thoroughly
Draining the tuna properly is one of the most important steps in this recipe.
Place the tuna in a fine-mesh strainer or simply drain it carefully from the can. Press the tuna gently with the back of a fork to remove excess liquid.
You do not want the tuna to be completely dry, but too much liquid can make your creamy mixture watery.
Once drained, transfer the tuna to a medium-sized mixing bowl.
Step 3: Make the Creamy Dressing
In a separate bowl, add the Greek yogurt.
Next, add the light mayonnaise. The Greek yogurt creates the main creamy base, while the mayonnaise contributes a richer flavor and smoother texture.
Add the fresh lemon juice and Dijon mustard.
Sprinkle in the garlic powder and add a little black pepper.
Stir everything together thoroughly until the dressing becomes smooth and evenly combined.
Taste the dressing before adding it to the tuna. If you prefer a stronger lemon flavor, add a little extra lemon juice. If you like a slightly more savory flavor, add a small amount of additional mustard.
Step 4: Prepare the Vegetables
Now prepare the vegetables.
Finely chop the celery into small pieces. Celery provides a crisp texture that contrasts beautifully with the creamy tuna.
Finely chop the red onion. Red onion adds a mild sharpness and gives the tuna salad a little extra flavor.
Chop the parsley and set it aside.
If you are using pickles, finely chop them too. Pickles are optional, but they add a delicious tangy flavor.
Step 5: Combine the Tuna and Vegetables
Add the chopped celery, red onion, parsley, and optional pickles to the bowl containing the drained tuna.
Use a fork to gently mix the ingredients together.
Do not mash everything into a paste. Keeping some small pieces of tuna intact gives the finished dish a better texture.
Make sure the vegetables are evenly distributed throughout the tuna.
Step 6: Add the Creamy Dressing
Pour the prepared Greek yogurt dressing over the tuna mixture.
Using a fork or spoon, gently fold everything together.
Continue mixing until the tuna is coated with the creamy dressing and the vegetables are evenly distributed.
Take your time with this step. Gentle mixing helps preserve the texture of the tuna while still creating a cohesive creamy mixture.
Step 7: Adjust the Consistency
Look at the consistency of your tuna mixture.
If it seems too thick, add 1 tablespoon of water or milk and stir. If necessary, add another tablespoon.
Do not add too much liquid at once because it is easier to thin the mixture gradually than to fix one that has become too watery.
If the mixture is too loose, add a little more Greek yogurt.
The ideal consistency should be creamy and spreadable without being runny.
Step 8: Taste and Season
Now comes the most important part: tasting.
Take a small spoonful and check the flavor.
Add additional black pepper if desired. Add salt gradually because tuna, mayonnaise, mustard, and pickles can already contain salt.
If you want the flavor to be brighter, add another small squeeze of lemon juice.
For a slightly different flavor, add fresh dill or a small pinch of paprika.
Remember that you can always add more seasoning, so start with a small amount.
Step 9: Chill the Tuna
Although you can eat the tuna immediately, chilling it for about 20–30 minutes can make it even more flavorful.
Place the bowl in the refrigerator and cover it.
During this time, the lemon, mustard, herbs, vegetables, and creamy dressing have a chance to blend with the tuna.
This short resting period also makes the salad particularly refreshing when served cold.
Step 10: Serve Your Healthy Creamy Tuna
There are many ways to enjoy this recipe.
Whole-Grain Toast
Spoon the creamy tuna onto toasted whole-grain bread. Add lettuce, tomato, or cucumber for extra freshness.
Wrap
Spread the tuna mixture over a tortilla or wrap. Add lettuce and sliced vegetables, then roll it tightly.
Salad Bowl
Place mixed greens into a bowl and spoon the creamy tuna on top. Add cucumber, tomatoes, carrots, or other vegetables you enjoy.
Lettuce Cups
For a fresh serving option, spoon the tuna into crisp lettuce leaves.
Crackers
Serve small portions of tuna with whole-grain crackers for an easy snack or light meal.
Baked Potato
A spoonful of creamy tuna can also make a simple baked potato more satisfying.
Helpful Tips for the Best Tuna
Use Well-Drained Tuna
Excess liquid can make your tuna mixture watery, so take a moment to drain the tuna properly.
Chop Vegetables Finely
Finely chopped celery and onion distribute better throughout the mixture and make the texture more pleasant.
Add Dressing Gradually
If you are unsure how creamy you want the tuna, add the dressing gradually rather than adding everything at once.
Taste Before Adding Salt
Some tuna, mayonnaise, mustard, and pickles can already be salty. Taste the mixture first.
Use Fresh Lemon Juice
Fresh lemon juice gives the recipe a bright, fresh flavor that works particularly well with tuna and Greek yogurt.
Easy Variations
This recipe is very flexible.
For a herby version, add fresh dill and parsley.
For extra crunch, add finely chopped cucumber, carrots, or bell peppers.
For a slightly spicy version, add a small amount of paprika or another mild seasoning.
For a sweeter variation, a small amount of finely chopped apple can provide a pleasant contrast to the savory tuna.
You can also replace some of the Greek yogurt with mashed avocado for a different creamy texture and flavor.
How to Store Healthy Creamy Tuna
Transfer leftovers to a clean airtight container and refrigerate promptly.
Keep the tuna mixture cold and use it within about 3 days.
If you notice an unusual smell, appearance, or texture, discard it rather than tasting it.
When serving, use a clean spoon each time to help keep the leftovers fresh.
Frequently Asked Questions
Can I make this tuna ahead of time?
Yes. Making it a few hours ahead can actually help the flavors develop. Keep it refrigerated until you are ready to serve.
Can I leave out the mayonnaise?
Yes. You can replace it with additional Greek yogurt. The final texture will be slightly different but still creamy.
Can I use canned tuna in oil?
Yes. Tuna packed in oil can be used, although the final dish will generally have a richer taste. Drain it well before mixing.
What vegetables can I add?
Celery and red onion are classic choices, but cucumber, carrot, bell pepper, and pickles can also work well.
Can I use dried herbs?
Yes. Fresh herbs provide a brighter flavor, but dried parsley or dill can be used when fresh herbs are unavailable.
Final Thoughts
This Healthy Creamy Tuna Recipe is a simple example of how a few everyday ingredients can create a flavorful and satisfying meal. Creamy Greek yogurt, a little mayonnaise, fresh lemon juice, Dijon mustard, tuna, celery, onion, and herbs come together to create a delicious combination of creamy, tangy, savory, and crunchy textures.
The recipe is easy enough for a busy weekday lunch but versatile enough to serve in several different ways. Keep it simple on toast, turn it into a wrap, spoon it over a salad, or enjoy it with fresh vegetables and crackers.
Once you make the basic version, you can experiment with different herbs, vegetables, and seasonings to create your own favorite combination. It is quick, customizable, and convenient—making it a great recipe to keep ready in the refrigerator for an easy meal.