
Ingredients
For the Crunchy Base
- 250 g digestive biscuits or plain tea biscuits
- 80 g melted butter
- 2 tablespoons brown sugar
- 1 teaspoon vanilla extract
- Pinch of salt
For the Caramel Layer
- 100 g butter
- 100 g brown sugar
- 1 can sweetened condensed milk, about 395 g
- 2 tablespoons golden syrup or honey
- 1 teaspoon vanilla extract
- Pinch of salt
For the Chocolate Topping
- 250 g milk or dark chocolate
- 1 tablespoon coconut oil or butter
Equipment
You will need:
- 20 cm × 20 cm square baking pan
- Baking parchment
- Food processor or rolling pin
- Medium saucepan
- Spatula
- Mixing bowl
- Refrigerator
Step 1: Prepare the Pan
Start by lining a square baking pan with parchment paper.
Leave some parchment hanging over the sides. This will make it much easier to lift the finished bars from the pan.
Press the parchment firmly into the corners and smooth it as much as possible.
Set the prepared pan aside while you make the base.
Step 2: Crush the Biscuits
Place the digestive biscuits in a food processor.
Pulse until they become fine crumbs.
If you do not have a food processor, place the biscuits into a strong sealed bag and crush them with a rolling pin.
You want mostly fine crumbs, although a few tiny crunchy pieces are perfectly fine.
Transfer the crumbs to a mixing bowl.
Step 3: Make the Crunchy Base
Add the melted butter, brown sugar, vanilla extract, and a small pinch of salt to the biscuit crumbs.
Mix thoroughly.
The mixture should resemble damp crumbs and should hold together when pressed.
If it seems too dry, add a small amount of melted butter.
Step 4: Press Into the Pan
Transfer the biscuit mixture into the prepared baking pan.
Use the back of a spoon, a flat spatula, or the bottom of a glass to press it firmly into an even layer.
Press particularly well around the corners and edges.
A firmly packed base will make the bars easier to cut later.
Place the pan in the refrigerator while preparing the caramel.
Step 5: Make the Caramel
Place a medium saucepan over low to medium heat.
Add the butter, brown sugar, sweetened condensed milk, and golden syrup or honey.
Stir continuously with a heat-resistant spatula.
The butter will melt first, followed by the sugar and condensed milk.
Continue heating gently until the mixture becomes smooth and thick.
Do not leave the saucepan unattended.
Keep stirring so the caramel does not stick or burn on the bottom.
Step 6: Cook Until Thick
Continue cooking the caramel for approximately 5–8 minutes, depending on your heat level.
The mixture should become thicker and slightly darker.
It should coat the back of your spatula.
Be careful because caramel becomes extremely hot.
Once the mixture has thickened, remove the saucepan from the heat.
Stir in the vanilla extract and a pinch of salt.
The salt helps balance the sweetness and gives the caramel a richer flavor.
Step 7: Add the Caramel Layer
Remove the chilled biscuit base from the refrigerator.
Carefully pour the warm caramel over the base.
Use a spatula to spread it evenly from edge to edge.
Try to create a smooth, level layer.
Return the pan to the refrigerator.
Chill for approximately 1–2 hours, or until the caramel has become firm enough to support the chocolate layer.
Step 8: Melt the Chocolate
Break the chocolate into small pieces.
Place it in a heatproof bowl.
Add the coconut oil or butter.
Melt gently using a double boiler or microwave.
If using a microwave, heat in short intervals and stir between each interval.
Do not overheat the chocolate.
Continue stirring until it becomes completely smooth and glossy.
Step 9: Add the Chocolate Layer
Remove the chilled caramel layer from the refrigerator.
Pour the melted chocolate over the caramel.
Spread it evenly with a spatula.
Work fairly quickly because the chocolate will begin to thicken as it cools.
For a decorative finish, you can sprinkle a tiny amount of flaky salt over the chocolate before it sets.
Step 10: Chill Until Firm
Place the pan back into the refrigerator.
Allow the bars to chill for at least 2–3 hours.
For the cleanest slices, you can leave them overnight.
The biscuit base will firm up, the caramel will set, and the chocolate topping will become solid.
Step 11: Remove From the Pan
Once completely chilled, lift the bars from the pan using the parchment paper.
Place them on a cutting board.
Allow them to sit at room temperature for approximately 5–10 minutes before cutting.
This makes the chocolate slightly easier to slice without cracking.
Step 12: Cut Into Bars
Use a sharp knife to cut the slab into squares or rectangles.
For cleaner cuts, dip the knife in warm water and wipe it completely dry before slicing.
Press down gently rather than sawing aggressively through the layers.
Wipe the knife between cuts if necessary.
Texture of the Finished Bars
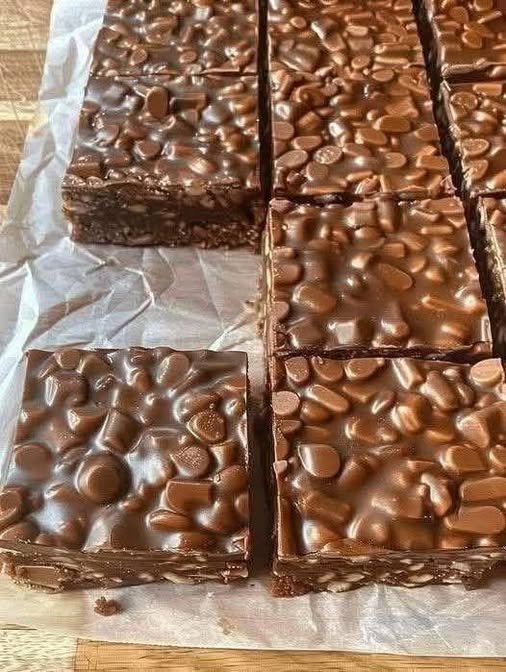
A good No-Bake Caramel Chocolate Crunch Bar should have three distinct layers.
The bottom should be firm and crunchy.
The middle should be soft, rich, and chewy.
The top should be smooth and chocolatey.
Together, these textures create a dessert that is both crunchy and creamy.
Helpful Tips
Use Good-Quality Chocolate
The chocolate topping is one of the main flavors, so choose chocolate that you enjoy eating on its own.
Milk chocolate creates a sweeter dessert, while dark chocolate provides a richer contrast to the caramel.
Don’t Rush the Caramel
Keep the heat moderate and stir continuously.
High heat can cause the caramel mixture to scorch or become uneven.
Let Each Layer Set
Do not pour chocolate over caramel that is still very loose.
The caramel needs enough time to firm up first.
Otherwise, the layers can mix together.
Don’t Overheat Chocolate
Chocolate can become thick or grainy if overheated.
Melt it gently and stir frequently.
Use Parchment Paper
Parchment makes removing the finished slab much easier.
Leave some overhang on two sides so you can lift the entire dessert out of the pan.
Optional Toppings
You can customize these bars with different toppings.
Try adding:
- Flaky salt
- Chopped roasted nuts
- Crushed biscuits
- Coconut flakes
- Mini chocolate chips
- Chopped hazelnuts
- Toasted almonds
- Chocolate curls
For a particularly simple finish, just leave the chocolate smooth.
How to Store
Store the finished bars in an airtight container.
They can be kept in the refrigerator for several days.
Because the caramel and chocolate become quite firm when cold, allow each bar to sit at room temperature for a few minutes before eating.
You can also freeze the bars.
Place parchment between individual pieces to prevent them from sticking together.
Thaw them in the refrigerator before serving.
Serving Ideas
These bars are delicious with a cup of tea, coffee, or cold milk.
You can also serve them as part of a dessert platter.
For a special presentation, cut them into small bite-sized squares and place them in paper candy cups.
They are rich, so small pieces can be enough for a satisfying sweet treat.
Easy Variations
Salted Caramel Chocolate Crunch Bars
Add a small amount of flaky salt to the caramel and sprinkle a little more over the chocolate.
The salty-sweet combination is delicious.
Dark Chocolate Version
Use dark chocolate for the topping.
The bitterness of dark chocolate balances the sweet caramel beautifully.
Nutty Crunch Bars
Add finely chopped toasted almonds or hazelnuts to the biscuit base.
This gives the bottom layer extra crunch.
Coconut Chocolate Bars
Mix a small amount of shredded coconut into the biscuit base.
The coconut pairs especially well with caramel and chocolate.
Why You’ll Love This Recipe
There are many reasons these No-Bake Caramel Chocolate Crunch Bars are worth making.
They require no oven, use simple ingredients, and can be prepared ahead of time.
The recipe also offers plenty of opportunities for customization.
You can make the chocolate topping darker, add nuts to the base, sprinkle the top with salt, or use different biscuits for the crunchy layer.
Most importantly, the finished bars look impressive even though the preparation is straightforward.
Frequently Asked Questions
Can I use graham crackers instead of digestive biscuits?
Yes. Graham crackers can be used as a substitute. The texture may be slightly different, but they work well for a no-bake crumb base.
Can I use dark chocolate?
Absolutely. Dark chocolate is an excellent choice if you prefer a less sweet topping.
Why is my caramel too soft?
The caramel may not have been cooked long enough, or it may not have cooled completely. Give it additional chilling time before adding the chocolate layer.
Why did my chocolate crack when cutting?
Very cold chocolate can crack when cut. Let the bars sit at room temperature for a few minutes and use a sharp, slightly warmed knife.
Can I make these ahead?
Yes. These bars are ideal for making ahead because they need refrigeration to set. Preparing them the day before serving can make the process easier.
Final Thoughts
No-Bake Caramel Chocolate Crunch Bars are an easy and delicious dessert made from three irresistible layers. The crunchy biscuit base provides texture, the rich caramel brings buttery sweetness, and the smooth chocolate topping finishes everything beautifully.
The recipe is simple enough for everyday baking but attractive enough for celebrations and special occasions. Since there is no oven involved, it is also a convenient choice when you want to make dessert without spending a lot of time baking.
For the best results, take your time with each layer. Press the biscuit base firmly, cook the caramel gently until thick, allow the caramel to chill properly, and melt the chocolate carefully.
Once everything has set, cut the bars into neat squares and enjoy the wonderful combination of crunchy biscuit, creamy caramel, and rich chocolate.
These bars are best served slightly softened from the refrigerator, when the caramel becomes deliciously chewy and the chocolate has just enough firmness to provide a satisfying bite.
Whether you make them for family, guests, a party, or simply because you are craving something sweet, these No-Bake Caramel Chocolate Crunch Bars are a delicious homemade treat that is sure to disappear quickly.